Halloween is one of the most thrilling times of the year for kids, filled with costumes, lollies, and spooky adventures. But beyond trick-or-treating and haunted houses, Halloween also presents the perfect chance for kids to unleash their creativity by engaging in DIY craft activities.
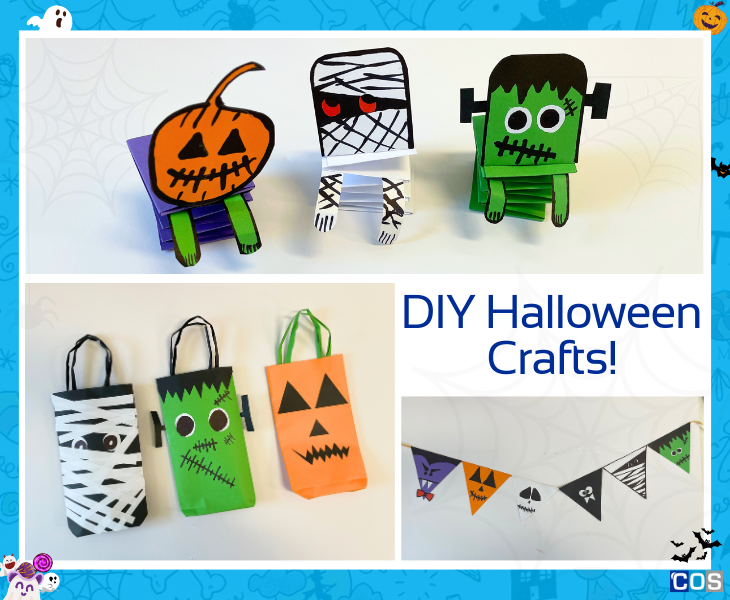
Bouncing Paper Halloween Characters
Turn your favorite spooky characters into playful, bouncy paper creations. Whether it’s a bouncing ghost, a wobbly pumpkin, or a dancing skeleton, this craft is easy to make and even more fun to play with afterward.

Materials Needed:
- A4 coloured copy paper
- Markers
- Crayons or coloured pencils
- Ruler
- Craft scissors
- Pencil
- Glue stick or PVA glue
Instructions:
1. Cut paper strips: Start by cutting two long strips of coloured copy paper, each measuring 4cm wide x 24cm long.
2. Layer the strips: Neatly lay one strip over the other. Fold one side of the top strip over the bottom strip, continuing until you reach the end. Secure the corners with a glue stick.
3. Draw your halloween character: Take a square piece of copy paper, 4cm x 4cm, and draw your favourite Halloween character. Use a marker to outline the facial features for a bold look.
4. Cut-out the character: Carefully cut out your Halloween character using scissors.
5. Stick the character: Glue your cut-out Halloween character to the last flap of your folded strips.
6. Create hands: Draw hands on another piece of paper measuring 1cm W x 3cm L, then cut them out.
7. Attach the hands: Glue the hands to the underside of the folded paper, positioning them beneath the Halloween character’s face.
2. Spooky Bunting Flags
Bunting flags add a festive atmosphere to any Halloween party or space. These DIY spooky flags are perfect for hanging on school bulletin boards, across windows, or even outdoors. Easy to make and can be customised with a range of Halloween-themed designs like bats, ghosts, witches, and pumpkins.

Materials Needed:
- A4 coloured copy paper
- Markers
- Crayons or coloured pencils
- Craft scissors
- Ruler
- Pencil
- Glue stick or PVA glue
- String, twine, or ribbon
- Punch hole (optional)
- Tape (optional)
Instructions:
1. Choose Your flag shape: Get creative with your flag design. Popular shapes include triangles, rectangles, or festive pennants.
2. Draw the shapes: Grab a ruler and pencil, and draw your shapes on vibrant coloured paper. For a triangle, measure 12cm x 12cm for both the length and width. Once done, mark the centre and draw the triangle.
3. Cut-out the flags: Carefully cut-out the flags using scissors. Try to cut in uniform sizes for a eye-catching display.
4. Decorate the flags: Use markers to create spooky Halloween-themed shapes (like ghosts, pumpkins, spiders, frankenstein, or bats directly) on your triangle shapes, or draw the designs on a separate sheet and cut them out.
5. Position the flags: Once done with designing the Halloween characters, lay the flags out on a flat surface to decide their order and spacing.
5. Cut the string: Measure and cut a length of string/twine or ribbon that fits the space where you want to hang the bunting, adding extra length for tying.
7. Glue or tape: Use glue or double-sided tape to attach the top of each flag to the string. Make sure to leave space between each flag.
8. Punch holes (optional): Alternatively, you can use a hole punch at the top corners of each flag and thread the string through.
9. Secure the flags: If using glue, allow it to dry completely before moving the bunting.
10. Add any embellishments: Consider adding additional elements like glitter or spooky embellishments for extra flair.
3. Spooktacular Treat Bags
No Halloween celebration is complete without treat bags! These DIY spooky treat bags are perfect for handing out candy or small toys at a Halloween party or for trick-or-treating.

Materials Needed:
- A4 coloured copy paper
- Craft scissors
- Crayons or coloured pencils
- Ruler
- Markers
- Pencil
- Glue stick or PVA glue
- Punch hole (optional)
- Tape (optional)
Instructions:
1. Prepare the paper: Start with a colored A4 sheet of paper. Fold it in half horizontally, ensuring that the edges align neatly. Leave a 1/2-inch margin on one side, which will help secure the bag later.
2. Glue the Margin: Apply glue along the 1/2-inch margin to secure the fold. This will create a sturdy seam that keeps the bag closed.
3. Create the bottom of the treat bag: Next, fold the bottom of the sheet upwards by about 2 inches on each side to create a triangular shape. Make sure the folds are crisp and even. Glue the overlapping flaps together to secure the base of the bag.
4. Shape the Sides: To give your treat bag its distinctive shape, fold the long sides inward. Align the corners and press down to create clear crease lines.
5. Create decorative cut-outs: Once your bag is assembled, it’s time to get creative! Draw Halloween-themed shapes—such as pumpkins, ghosts, or bats—on another piece of paper. Carefully cut them out with scissors, ensuring clean edges.
6. Add decorative shapes: Stick the cut-out shapes onto your treat bags using a glue stick.
7. Make the handle: To create handles for your treat bags, cut out two strips of paper measuring 2cm wide x 12cm long. Fold the strips in half widthwise.
8. Attach the Handles: Create holes for the handles by using a hole punch, or alternatively, you can attach the handles inside the treat bags with tape.
9. Fill the bags with treats: Once your bag is all set, it’s time to add some delicious treats! Fill the bags with a variety of goodies, such as snakes, chocolates, or any other confectionery items of your choice.
For more Halloween DIY crafts, check out our Halloween Mystery DIY Boxes for Kids – packed with spooky explosion boxes and pop-up mystery boxes. Or, get your hands on Spooktacular DIY Halloween Bookmarks for Kids – a fun and crafty way to mark your place in a favourite spooky story!
Happy crafting and have a spook-tacular Halloween!