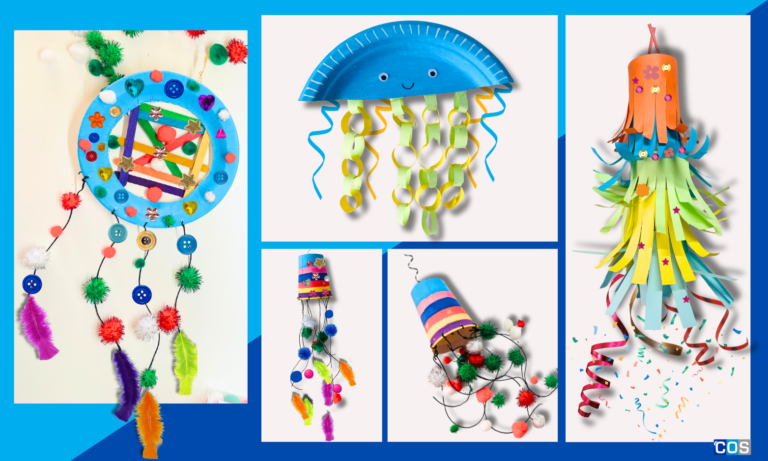
We’ve curated 4 fun DIY upcycling crafts that make the most of materials that might otherwise end up in the waste bin. From creating a playful piñata garland using cardboard rolls to crafting a wind chime with paper cups, these projects offer endless possibilities for imagination.
So, gather up your spare paper plates, cardboard rolls, and old paper cups and dive into some creative, eco-friendly crafting fun that will contribute to a healthier planet!
1. Pull Piñata Garland with Cardboard Rolls
Materials Needed:
- Craft cardboard rolls
- Crepe paper or A4 size coloured copy paper
- String/ribbon
- For decoration (pom-poms, buttons, rhinestones, or sequins)
- Glue stick/PVA glue
- Pencil
- Scissors
- Small treats or confetti
Instructions:
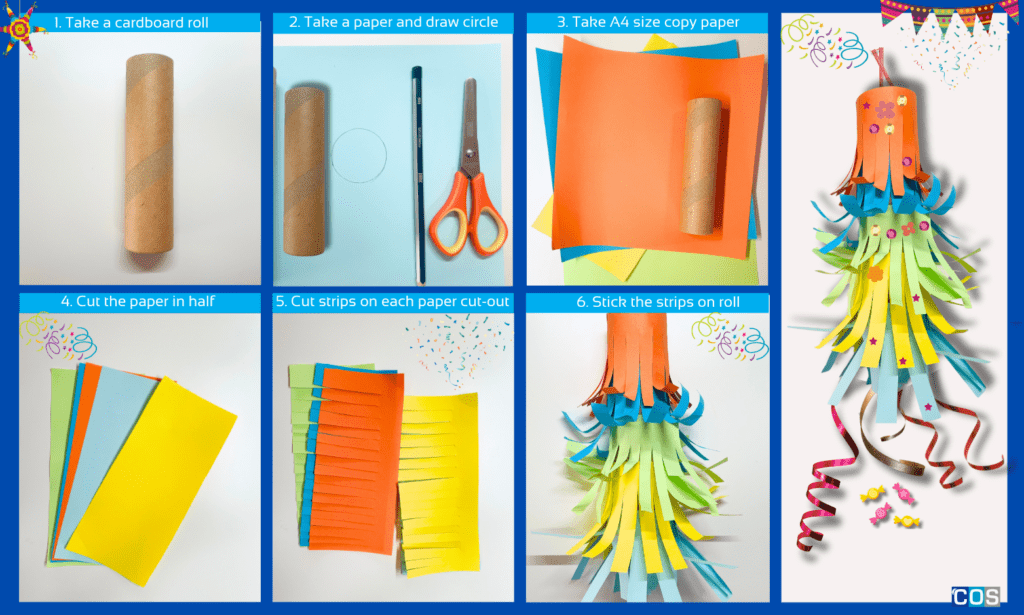
1. Start by tracing the cardboard tissue roll onto a piece of crepe paper or copy paper to create a pullable base for the piñata.
2. Make a small “X” cut in the centre of each and stick it at the bottom.
3. Take different coloured crepe paper or copy paper and fold lengthwise to about 2 cm x wide.
4. Once done, cut into 1.5 cm x rectangles.
5. Carefully cut slits or fringers, leaving about 0.25 cm uncut at the top.
6. Begin wrapping the fringed pieces around the bottom of the tube, working your way up and securing with tape or glue.
7. Attach a ribbon or string at the top to create a hanger.
8. Secure 2 x 3 cm pieces of ribbon on opposite sides inside the tube with tape, creating an easy pull for the base.
9. Decorate your piñata with rhinestones, sequins, or other embellishments for added flair.
10. Fill with candy, confetti, fortunes, small toys, or other treats from the top.
11. Hang your piñata on a sturdy string and get ready to party!
2. Paper Plate Jellyfish with Paper Tentacles
Materials Needed:
- Paper plate
- Paint or paint sticks (for colouring the plate)
- Snap cutter
- Ruler
- Pencil
- A4 size coloured copy paper (for the tentacles)
- String/ribbon
- Markers
- Joggle eyes
- For decoration (pom-poms, buttons, rhinestones, glitter, or sequins)
- Glue stick
- Hole puncher (optional for creating holes for the loops)
Instructions:
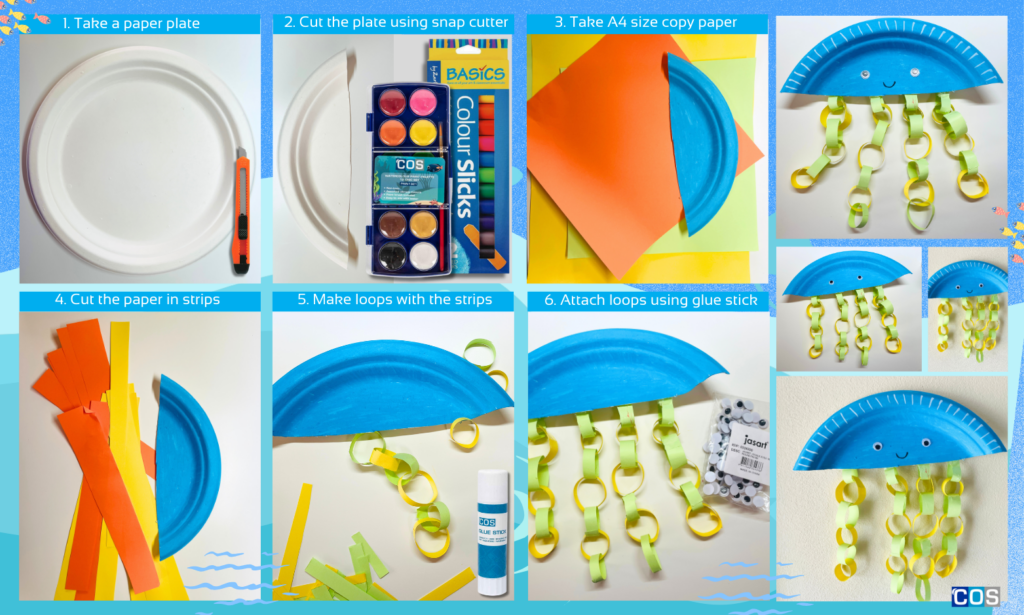
1. Take a paper plate and start by cutting it in half using a snap cutter or scissors.
2. Use paint or markers to colour your paper plate. If you’re painting, allow it to dry completely before moving to the next step.
3. Take 2 pieces of coloured copy paper and mark 2 cm x wide strips, then cut them out.
4. Cut each strip in half to create smaller pieces that will form the tentacle loops.
5. Roll each strip into a loop and secure the ends with glue or tape to give the tentacles a fun, bouncy texture.
6. Attach each looped strip along the bottom edge of the paper plate half, so they dangle below like jellyfish tentacles.
7. Draw a cute face on the plate using a marker, or stick on joggle eyes.
9. For extra sparkle, by decorating with sequins, small gems, or glitter.
10. Attach a ribbon or string at the top to create a hanger.
10. Your colourful paper jellyfish is ready to hang up.
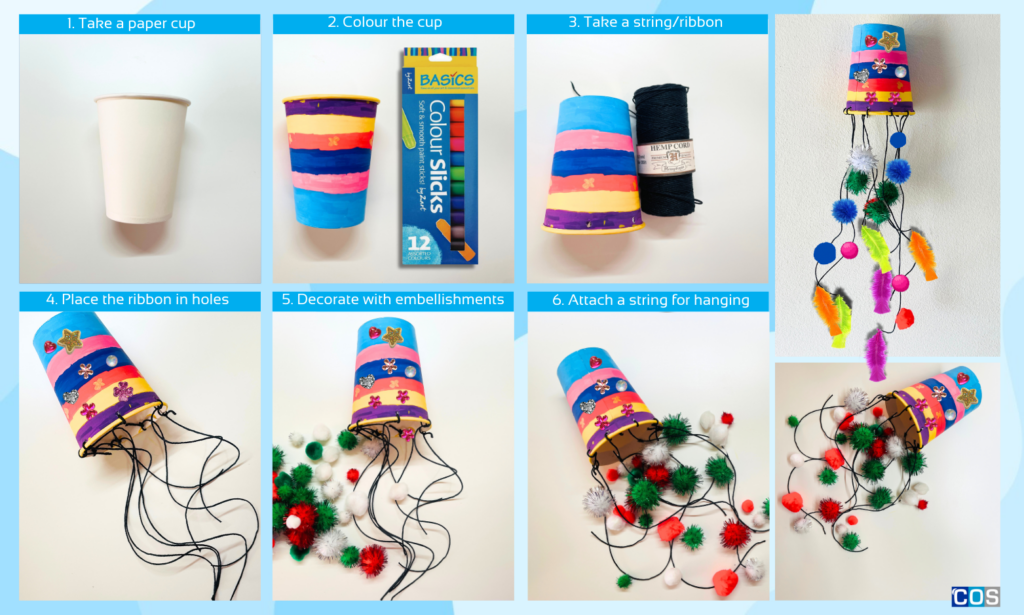
3. Paper Cup Wind Chime
Materials Needed:
- Paper cup (a sturdy one, like a small disposable cup)
- Colour slick/paint/marker
- String/ribbon
- For decoration (pom-poms, buttons, rhinestones, glitter, or sequins)
- Glue stick
- Scissors
- Craft feathers
- Hole puncher (optional, to make holes for attaching strings)
Instructions:
1. Begin by colouring the paper cup with markers, paint, or paint slicks. You can create patterns, stripes, polka dots, or even doodles.
2. Once the cup is coloured, cut several pieces of string, each about 8–12 x cm long.
3. Use a hole punch or sharp tool to create evenly spaced holes around the rim of the cup and one at the bottom for the main hanging string.
4. Thread each piece of string through a hole around the rim and tie a knot on the inside to secure.
5. Thread each decorated string through a hole in the rim of the cup and secure it with a knot on the inside.
6. Use a glue stick to attach rhinestones, jewels, or sequins along the strings for added sparkle.
7. Attach colourful craft feathers or small bells to the ends of each string.
8. Lastly, add a longer piece of string through the top hole for hanging.
8. Your colourful wind chime is ready to hang outdoors.
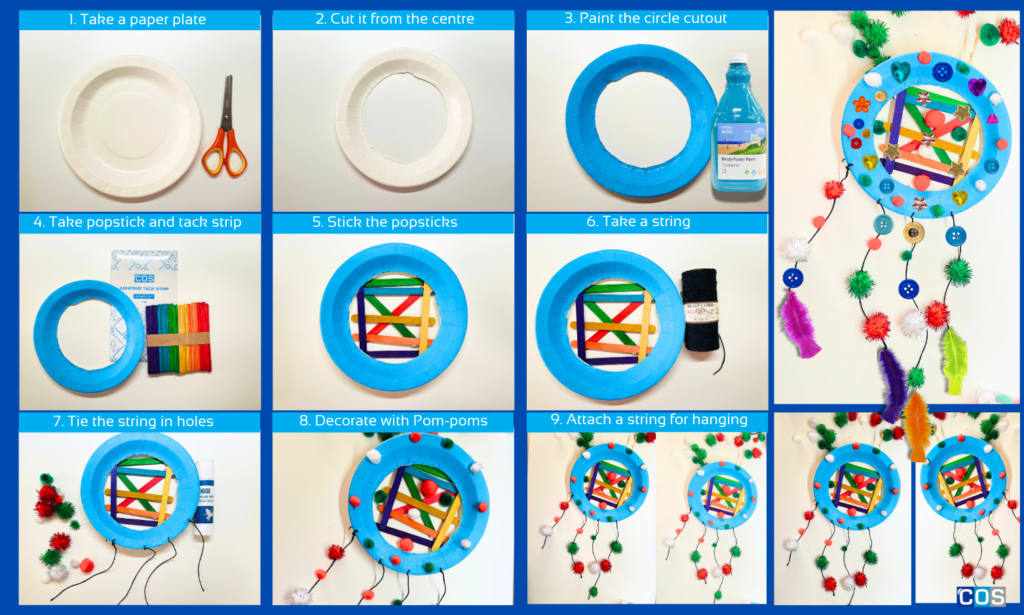
4. Paper Plate Dream Catcher
Materials Needed:
- Paper plate
- Popstick
- Markers, crayons, or paint (for colouring)
- String/ribbon
- For decoration (pom-poms, buttons, rhinestones, feathers, or sequins)
- Glue stick/adhesive tack/tape
- Scissors
- Snap cutter
- Hole puncher
Instructions:
1. Take a paper plate and cut it from the centre using a snap cutter, leaving just the rim.
2. Colour or paint the rim of the paper plate. This outer circle will serve as the frame for your dream catcher’s web.
3. Now take the popsticks and place them across the centre of the plate rim to form an “X” or star shape. You can use 8-10 popsicle sticks, depending on how many web lines you want.
4. Glue each popstick securely where it touches the rim of the plate.
5. Use a hole punch or sharp tool to make evenly spaced holes around the rim (4-5 holes).
6. Cut 4-5 pieces of string, each around 8 cm X long. Thread each piece through one of the holes, tying a knot to keep it secure.
7. Decorate the string by adding pom-poms and attaching feathers at the ends for a traditional dream catcher look.
8. Personalise the rim with fun decorations like buttons, rhinestones, or sequins to add a burst of colour and texture.
9. Finally, cut a longer piece of string or ribbon and thread it through one of the holes at the top of the rim. Tie a knot to form a hanging loop.
10. Hang your dream catcher near a window to let it sway.
If you’re looking for more fun and educational craft activities to teach kids sustainability, upcycling, and the importance of zero-waste practices, explore our “4 Fun and Creative Upcycled Plastic Waste Projects for Kids,” perfect for upcycling plastic waste into useful items like adorable planters, piggy banks, cute bracelets, and more.
Or checkout our “Zero-waste Craft Activities” to inspire kids to turn waste into treasure while fostering a thoughtful, minimalist, and eco-conscious mindset.
