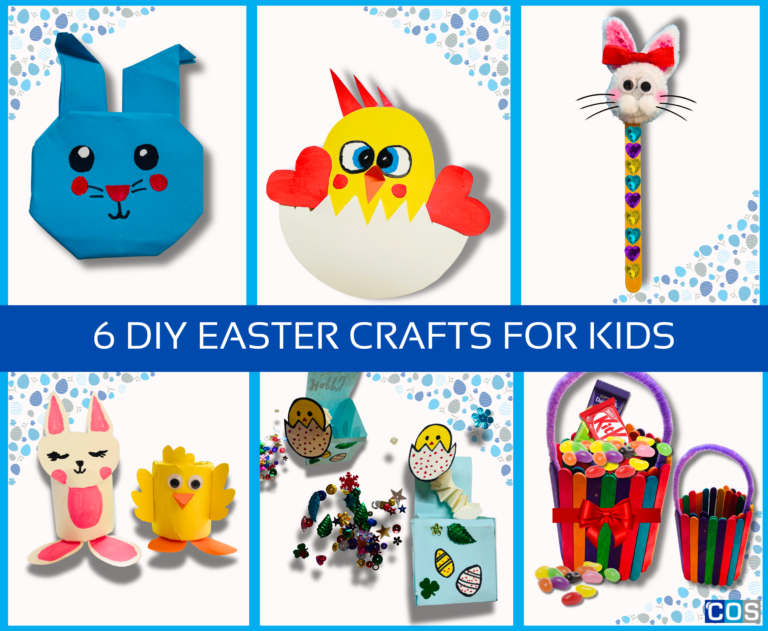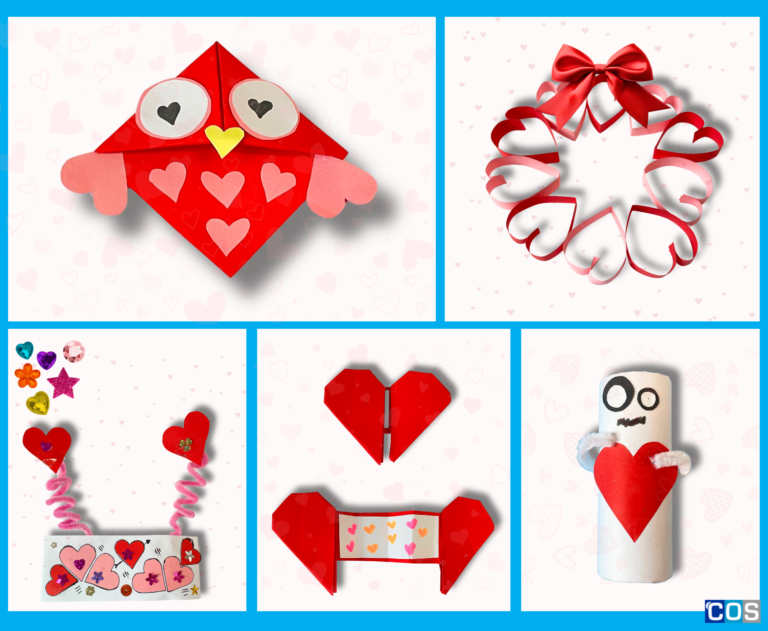
Whether it’s creating heartfelt bookmarks, festive wreaths, or other fun projects, we’ve compiled 5 fun craft ideas to spread love and joy this Valentine’s season.
These projects are not only easy to organise but also require minimal supplies such as paper, glue, scissors, and markers, making them perfect for classrooms, family crafting sessions, or after-school programs.
By embracing these simple, creative activities, children can connect with the spirit of Valentine’s Day in a meaningful way while learning important skills and values that will last a lifetime.
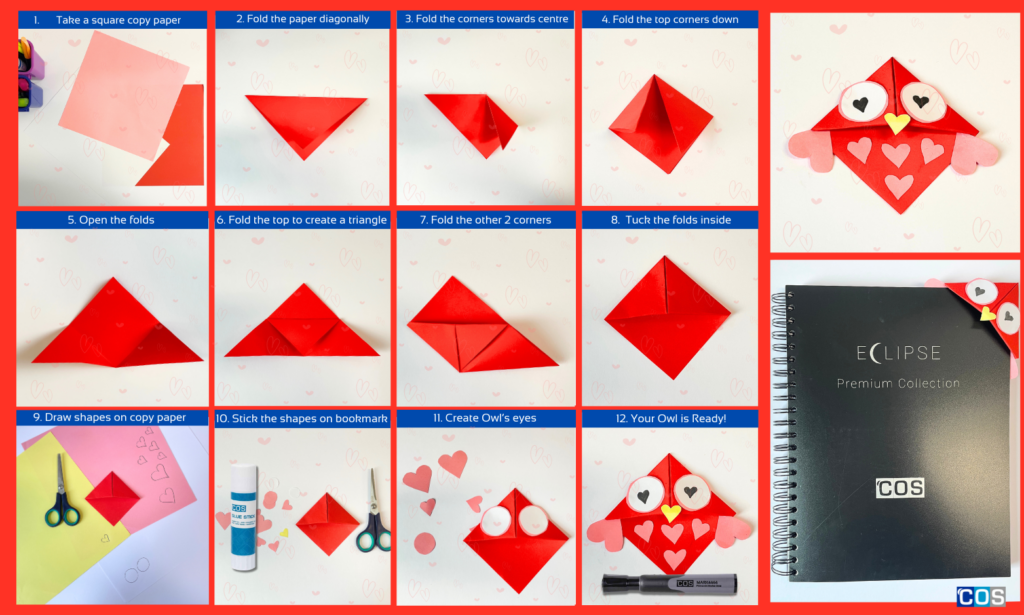
1. Owl Corner Bookmark
The Owl Corner Bookmark is a charming and practical craft for the book lovers. This adorable paper owl perches on the corner of book pages, holding a place in your favourite story.
With colourful paper, markers, and a touch of imagination, kids can create a unique design featuring hearts for wings and a bright Valentine’s vibe.
Materials Needed:
- Coloured copy paper
- Scissors
- Pencil
- PVA glue or glue stick
- Ruler
Step-by-Step Instructions:
1. Start with a square paper: Choose a colour for your bookmark. If you prefer, use patterned or coloured copy paper for a fun look.
2. Fold the paper diagonally: Fold the square paper in half diagonally to form a triangle. Make sure the edges line up, then crease well and unfold.
3. Fold the corners towards the centre: Take each of the four corners and fold them towards the centre of the square. You should have a smaller square with flaps in the middle.
4. Fold the top corners down: Now take the top two corners (the ones closest to you) and fold them down, so they point to the center bottom of the square, forming a triangle at the top.
5. Fold the bottom corners up: Flip the paper over, then take the two bottom corners and fold them upwards, forming the base of the owl’s face. The point should meet the fold at the top.
6. Add Decorative Details: Cut out heart shapes (or any shape you prefer) from a piece of copy paper. Glue them to the bottom of the bookmark for a playful touch.
7.Create the Owl’s Eyes: Draw two circles on copy paper, one smaller than the other. Make sure the larger circle sits above the bookmark, then stick it in place. Inside the circle, draw heart-shaped pupils for a cute, whimsical effect.
8.Make the Beak and Wings: Draw three heart shapes – two larger ones for the wings and one small one for the beak. Cut them out and assemble. Attach the smaller heart beneath the eyes to form the beak, then glue the larger hearts to the sides of the bookmark to create the owl’s wings.
9. Use the bookmark: To use it, simply slip the corner of the bookmark over the edge of a page, and your owl will be peeking out!
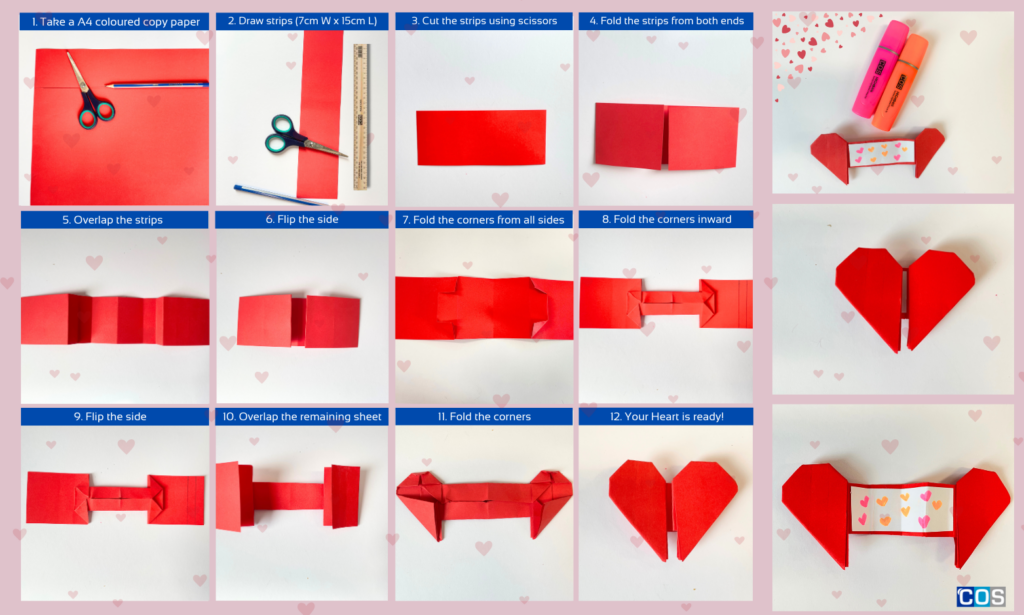
2. DIY Heart Slider Card
The DIY Heart Slider Card is a unique Valentine gift for parents, teachers, or loved ones, that features a movable heart element.
Kids can create a card that slides to reveal a hidden message. Whether it’s “I love you” or a personal note, this interactive design will surely bring smiles to their loved ones.
Materials Needed:
- A4-sized coloured paper
- Ruler
- Pencil
- Glue stick
- Scissors
- Coloured markers
Step-by-Step Instructions:
1. Create the card base: Begin by cutting a piece of copy paper to 7 cm x 15 cm to form the base of your card.
2. Prepare the Message Section: Take the cut-out and fold the paper in half lengthwise. Next, fold it in half again, ensuring the edges overlap slightly. Flip the paper over to reveal a rectangle shape. Fold each corner flap inward, creating triangular shapes on all four corners. Tuck the corner flaps inward to form a neat rectangle, which will serve as the section for writing your message.
3. Form the Heart Shape: On the rectangle, fold two small triangles from the top edge. At the bottom, fold the flap upward, overlapping it to create another triangle. Flip the paper over, and you’ll see the shape transform into a heart.
4. Create the Message Area: Cut a second piece of copy paper measuring 6 cm x 6.5 cm. Attach this cut-out piece to the centre of the rectangle to create a space for writing your heartfelt message.
Your DIY Heart Slider Card is complete, ready to bring a smile to someone’s face with its thoughtful design and personal touch!
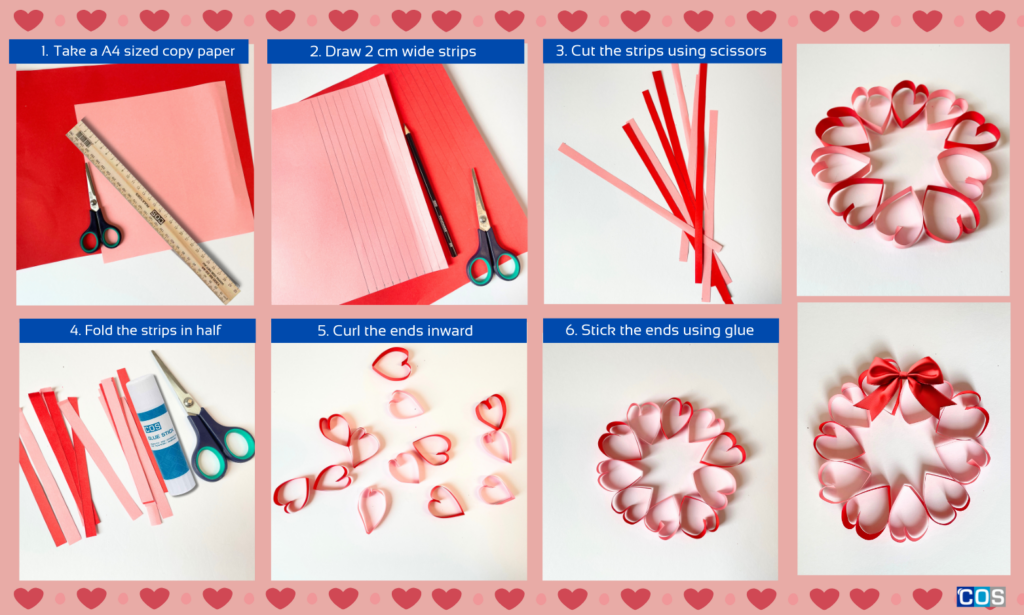
3. Heart-Shaped Paper Wreath
Brighten up any space with a Paper Heart Wreath made by little hands. This craft combines vibrant strips of paper folded into heart shapes and arranged into a wreath.
Kids can experiment with patterns, textures, and colours and hang it on doors or walls as a sweet decoration that spreads Valentine’s cheer to everyone.
Materials Needed:
- A4 sized coloured copy paper
- Glue stick
- Scissors
- Glitter, pom-poms, rhinestones, or sequins (for embellishments)
- Ruler
- Pencil
Step-by-Step Instructions:
1. Prepare Your Materials: Take 2 sheets of coloured copy paper and draw lines 2-3 cm wide and 11 cm long (adjust depending on your desired heart size).
2. Create Strips for the Hearts: Draw lines 2–3 cm wide and 11 cm long on the paper. Adjust the strip length if you prefer smaller or larger hearts. Cut the strips carefully using scissors. Each strip will form one heart.
3. Shape the Hearts: Fold each strip in half lengthwise to create a crease in the centre. Curl the loose ends inward toward the crease using your fingers or a pencil to form the shape of a heart. Secure the ends together with a glue stick to hold the heart shape firmly.
4. Assemble the Wreath: Arrange the paper hearts in a circular shape, alternating colours or patterns for added variety and visual appeal. Glue each heart to the next one using a glue stick, forming a complete circle.
5. Add the Final Touch: Attach a ribbon to the top of the wreath for hanging, or display it flat as a table centrepiece or wall decor.
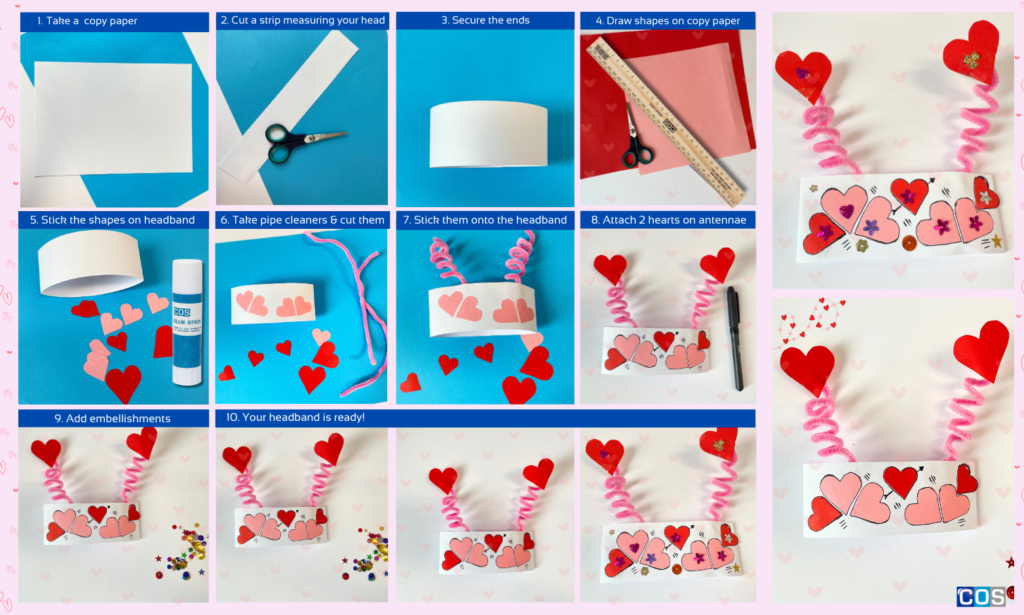
4. Love Bug Headband
The Lovebug Headband is a way for kids to dress up for the occasion. With pipe cleaners, pom-poms, and colourful paper, they can design cute “lovebug antennae” making it ideal for parties or classroom celebrations, adding an element of playful fun to the day’s festivities.
Materials Needed:
- A4-sized coloured copy paper
- Ruler
- Pencil
- Scissors
- Glitter, pom-poms, rhinestones, or sequins (for embellishments)
- Coloured marker
Step-by-Step Instructions:
1. Create the Headband Base: Take a coloured copy paper and cut a long strip of coloured paper to fit around your head. Measure it by wrapping it around your head to find the right length. If one strip isn’t long enough, tape two strips together. Trim any excess and lay the strip flat for decorating.
2. Decorate the Headband: Draw heart shapes on different coloured papers to add a vibrant touch. Start by cutting a square of paper and folding it in half. Draw half a heart along the fold, then carefully cut it out. When you unfold the paper, you’ll have a perfect heart. Stick the hearts onto the headband. Once decorated, tape the ends of the headband together to form a loop that fits snugly around your head.
3. Make the Love Bug Antennae: Cut out two large hearts to sit at the top of the antennae. For extra sparkle, glue a pom-pom or rhinestone in the centre of each heart.
4. Shape the Pipe Cleaners: Take a pipe cleaner and wrap it around your finger or a marker to create a coiled shape. Gently stretch the coil to your desired length, or experiment with unique bends to give your love bug a special look.
5. Assemble Your Antennae: Tape the coiled pipe cleaners onto the headband. Then, attach the hearts to the top ends of the pipe cleaners to complete your adorable love bug headband.
6. For Extra Sparkle: Add some bling by decorating the headband with rhinestones, pom-poms, or sequins for a fun and eye-catching touch.
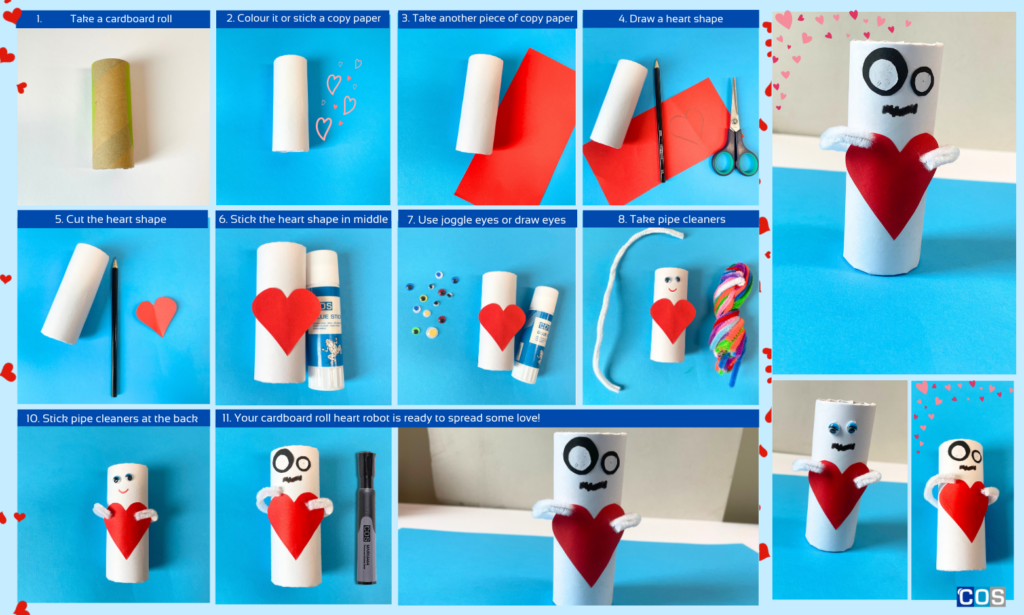
5. Cardboard Roll Heart Robot
With recycled cardboard tubes, joggle eyes, and heart-shaped embellishments, kids can create their own lovable robot buddy. This craft is not only fun but also a great opportunity to teach kids about reusing materials creatively.
Materials Needed:
- 1 cardboard roll
- A4-sized coloured copy paper
- Joggle eyes
- Pencil
- Pipe Cleaners
- Marker
- Scissors
- PVA glue or glue stick
Step-by-Step Instructions:
1. Prepare the Cardboard Roll: Take a cardboard roll and wrap it in white paper for a clean base. Alternatively, you can use paint to colour the cardboard roll.
2. Create the Robot’s Heart: Cut a heart shape from red construction paper and attach it to the front of the roll.
3. Add the Robot’s Eyes: Glue two googly eyes at the top of the cardboard roll to create the robot’s face. If you don’t have googly eyes, simply draw some with markers.
4. Make the Robot’s Arms and Legs: Cut pipe cleaners into small sections and twist them to shape arms. Glue them to the sides of the robot’s body.
5. Final Touches: For extra flair, add fun details like paper antennas, buttons, or gears to give your robot more personality.
Now you have a cute and fun heart-themed robot made from a cardboard roll!