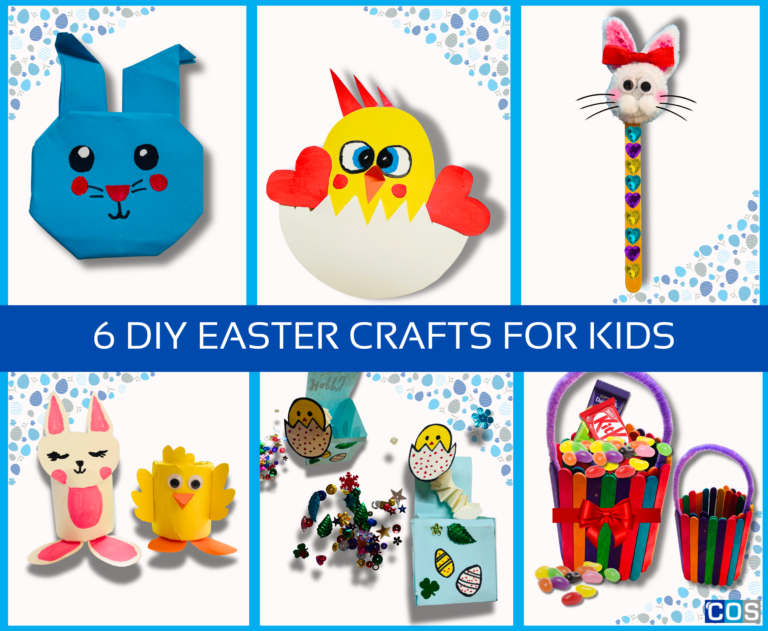
Easter is on its way, and what better way to celebrate than with some fun and creative crafts. Whether it’s decorating eggs, making bunny-themed creations, or designing handmade Easter cards, DIY crafts bring joy and creativity to the holiday.
These hands-on activities not only keep children entertained but also help develop their artistic skills and imagination. Whether you’re a parent looking for a festive activity, a teacher planning a classroom project, or a child who loves making things, these 6 Easter crafts are perfect for adding a touch of handmade charm to the season.
From a cute Origami Paper Bunny to a Popstick Basket, these projects are easy and enjoyable for all ages. With just a few supplies and a little imagination, these crafts will bring Easter joy to your home or classroom, making the Easter holiday even more special.
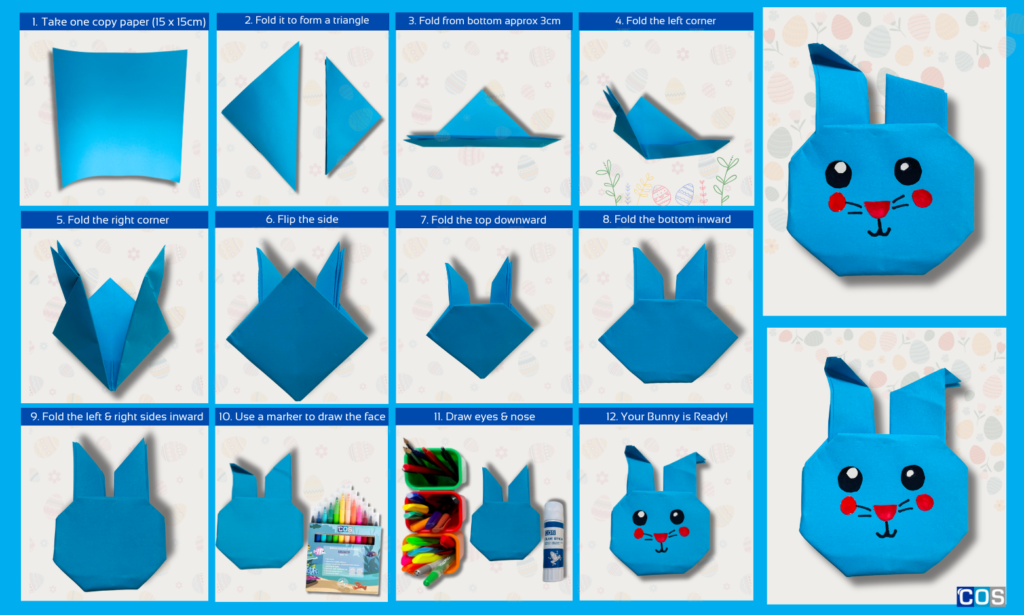
1. Origami Paper Bunny
Materials Needed:
- One square copy paper (preferably 15cm x 15cm)
- Coloured markers
- Glue stick
Instructions:
1. Make the Triangle Fold: Start with a square sheet of copy paper. Fold the paper diagonally in half to form a triangle. Unfold and fold diagonally in the opposite direction. Unfold again—you should see an “X” crease.
2. Fold into a Diamond Shape: Fold the paper in half horizontally, then unfold. Bring the left and right corners toward the centre, forming a diamond shape.
3. Shape the Bunny’s Head: Fold the bottom tip of the diamond slightly upward to round off the bunny’s face. Flip the origami over and fold a small tip at the bottom for the bunny’s nose.
4. Form the Bunny’s Ears: Take the top layer of the triangle (on one side) and fold it upward to form an ear. Repeat on the other side for the second ear.
5. Add Details: Draw eyes and a nose with a pen or marker. If you want the bunny to stand, fold the bottom slightly backward for balance.
And there you have it! A cute origami bunny. 🐰✨
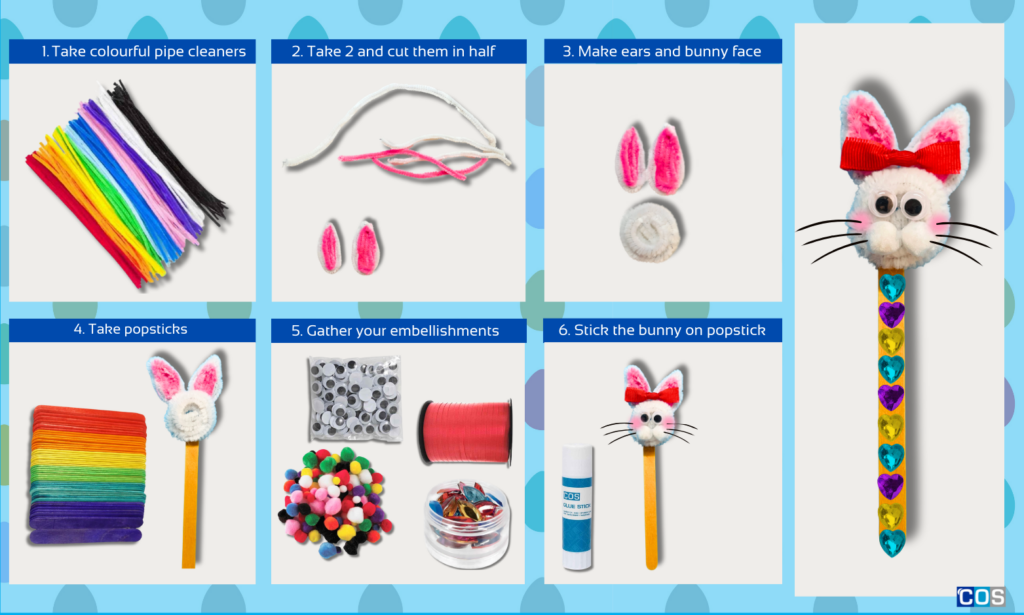
2. Pipe Cleaner Bunny
Materials Needed:
- Pipe cleaners
- Popstick (craft stick)
- Glue stick or PVA glue
- Scissors
- Ribbon
- Joggle eyes
- Rhinestones, pom-poms, or jewels for decoration
Instructions:
1. Create the Bunny’s Body: Take one pipe cleaner and wrap it around two fingers to create a coil (this will be the bunny’s body). Slide the coil off your fingers and gently shape it into a rounded body.
2. Make the Bunny’s Ears: Cut a pipe cleaner in half. Bend each half into a long loop to form two ears. Attach the ears by twisting the ends onto the head coil.
3. Add the Bunny’s Face: Glue two googly eyes onto the head. Attach 2 white pom-poms or bead just below the eyes for the nose.
4. Stick on Popstick: Attach the bunny face and ears on the popstick using glue. To decorate the stick you can use rhinestones, pom-poms, or jewels.
5. Attach the Bunny to the Stick: Use glue to secure the bunny’s body and head to a popstick. Decorate the stick with rhinestones, pom-poms, or jewels for a fun touch.
6. Finish with a Bow: Tie a small ribbon into a bow. Glue it on top of the bunny’s head for an extra cute detail.
Your Pipe Cleaner Bunny is Ready! 🐰
3. DIY Surprise Box with Easter Chick
Materials Needed:
- Coloured copy paper
- Scissors
- Glue stick
- Ruler
- Pencil
- Coloured markers
- Crayons
- Rhinestones, jewels, or pom-poms for decoration
Instructions:
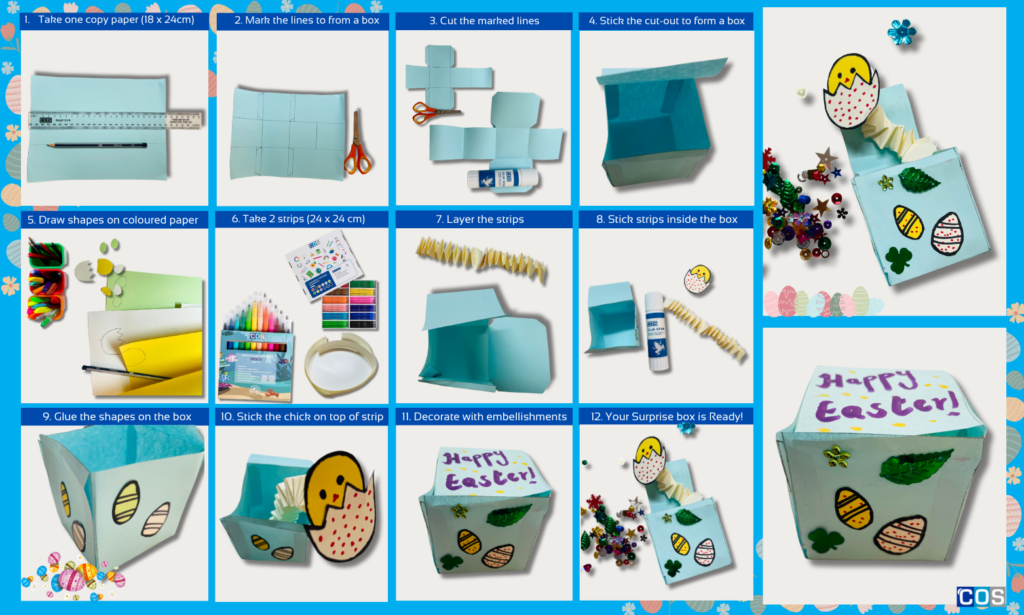
1. For Making the Surprise Box: Take a 18 x 24 cm paper and mark a grid. Make 6cm x 13cm on both sides. Mark 5cm, 6cm, 12cm, and 13cm and draw the box shape connecting each other.
2. Create the Box Shape: Fold along the marked lines to form a cube-like shape. Glue the Box and fold up the sides and secure them with glue stick.
3. Make the Bouncing Strips: Cut 2 Thin Strips (1.5 x 24 cm each). Fold one strip over the other in a crisscross pattern until the end. Glue the ends to keep the spring shape intact.
4. Create the Easter Chick: Cut Out the Chick’s Body: Use yellow copy paper to cut an oval (about 5 x 6 cm). Cut and glue small orange triangles for the beak. Use a marker for the eyes. Cut and attach two small wings and a fun headpiece (e.g., a tiny eggshell hat or feathers) for extra detail.
6. Assemble the Surprise Box: Attach the strips by gluing one end inside the box and the other end to the bottom of the chick. Place the and press the chick down and close the lid.
7. For Decoration: You can stick some jewels, rhinestones, pom-poms or egg shape cut-outs on the box.
Surprise! When the lid is opened, the chick will bounce up.🐣🎉
4. Chick Paper Rocker
Materials Needed:
- Yellow construction paper or copy paper
- Orange copy paper (for beak and feet)
- White paper (for eyes) or joggle eyes
- Scissors
- Glue stick
- Coloured Markers
- Circular object (like a bowl or lid)
- Optional: Feathers or glitter for decoration
Instructions:
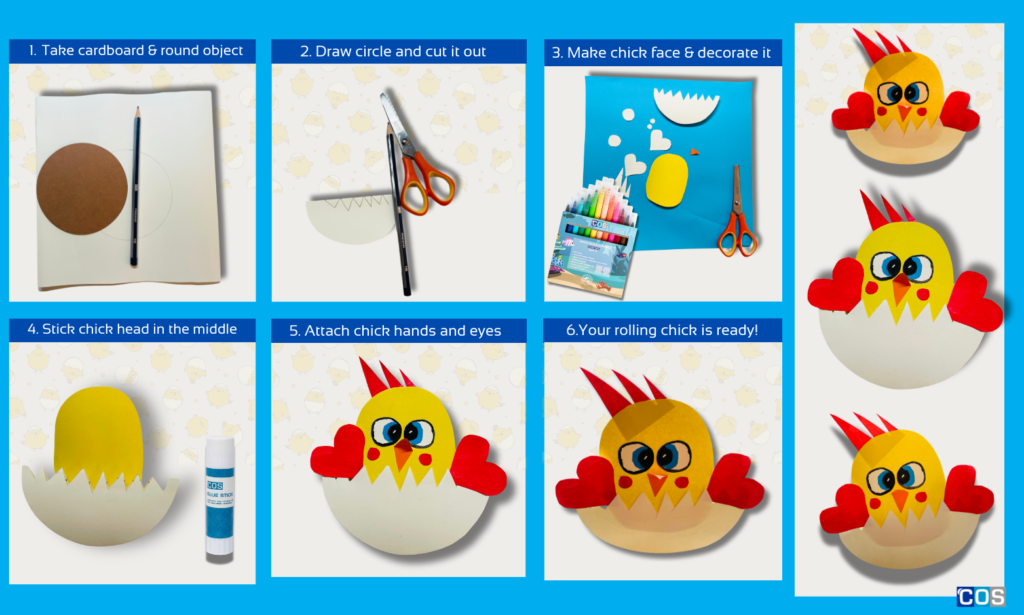
1. Cut Out a Circle: Use a circular object to trace a large circle onto yellow construction paper. Cut it out and fold it in half to create the rocking base.
2. Make Egg Crack Shape: Draw a zigzag crack across the middle of the folded circle. Carefully cut along the lines to create an opening for the chick.
3. Make the Chick’s Face:Draw an oval shape from yellow paper, ensuring it fits within the egg crack.
4. Add Facial Features: Cut out small white circles for the eyes and draw black & blue pupils with a marker (or use joggle eyes). Cut a small triangle from orange paper for the beak. Glue the eyes and beak onto the folded circle.
5. Add Wings & Accessories: Cut out small wing shapes and a headpiece, then glue them onto the sides of the chick.
6. Decorate (Optional): Add feathers, glitter, or draw extra details with markers.
7. Make It Rock: Gently press down on one side and watch it wobble back and forth. 🐣
5. Popstick Easter Basket
Materials Needed:
- Wooden popsticks
- Cardboard or thick paper (for the base)
- Craft glue or glue stick
- Pipe cleaners
- Scissors
- Paint or markers (optional for decoration)
- Adhesive foam letters
- Ribbon or decorative items (optional)
Instructions:
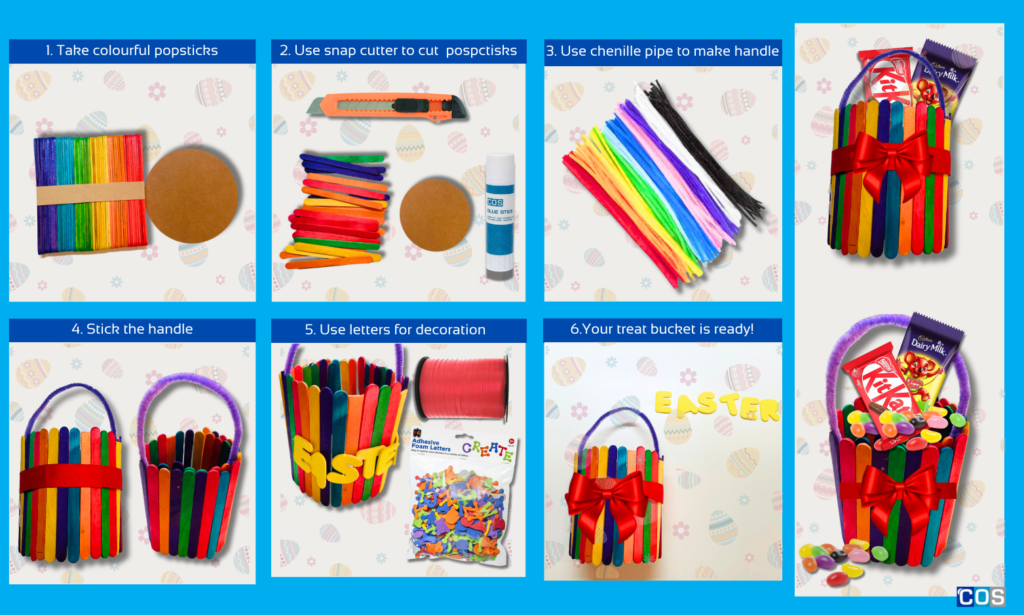
1. Prepare the Base: Cut a circular piece of cardboard (about 10 cm in diameter) for the bottom of the basket. If desired, paint or decorate the cardboard base.
2. Trim the Popsticks: Use a snap cutter to flatten the bottom of each popstick, ensuring they stand upright when glued.
3. Build the Basket Walls: Apply a thin line of glue around the edge of the cardboard base. Attach popsticks vertically around the base, spacing them evenly. Continue adding popsticks until you’ve formed a full circular basket wall. Let the glue fully dry before moving to the next step.
4. Secure with a Ribbon: Wrap a ribbon around the outside of the basket and tie it tightly to help hold the structure together.
5. Create the Basket Handle: Take two chenille stems and twist or glue them end-to-end to form a longer strip. Attach the ends of the chenille stems to opposite sides of the basket, creating a sturdy handle.
6. Decorate Your Basket: Attach rhinestones, stickers, or small decorative elements to personalise your basket.
Fill it with chocolate eggs, candies, or small gifts to make it extra special. 🐰🥚✨
6. Cardboard Roll Bunny & Chick
Materials Needed:
- 2 cardboard rolls
- Coloured craft paper
- Joggle eyes
- Scissors
- Glue stick or craft glue
- Coloured markers or crayons
Instructions for Making a Bunny:
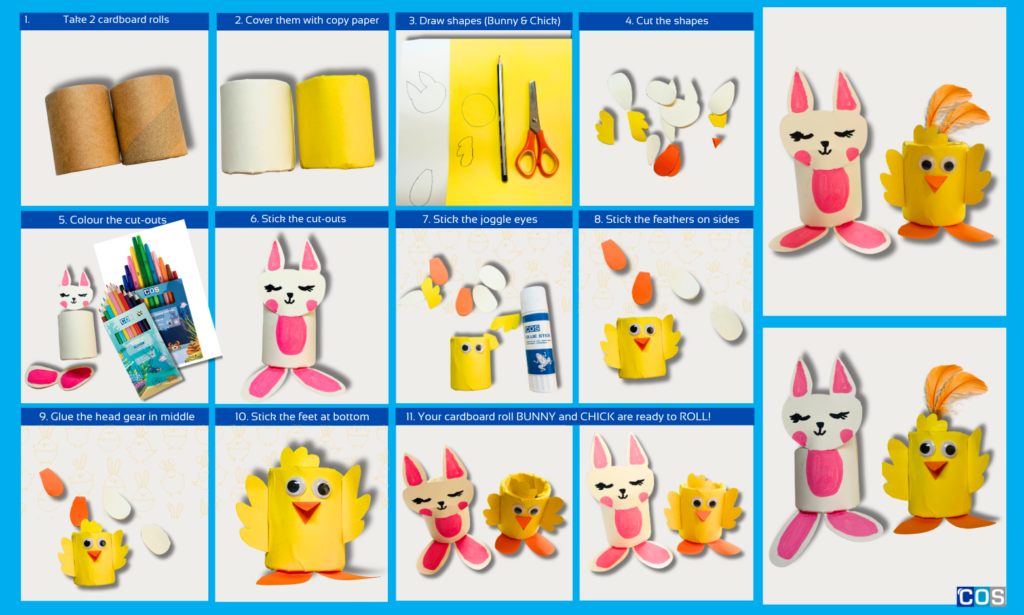
1. Prepare the Roll: Trim the cardboard roll to your preferred height and wrap it in white craft paper. Secure it with glue.
2. Create the Face & Feet: Draw a bunny face and feet on plain paper, then carefully cut them out.
3. Add Details: Use crayons, coloured pencils, or markers for making eyes, nose, and ears.
4. Assemble the Bunny: Glue the face cut-out to the top of the cardboard roll and attach the feet at the base. Press gently to secure.
Instructions for Making a Chick:
1. Wrap & Secure: Cover a cardboard roll with yellow craft paper and glue it in place.
2. Create Features: Draw a small orange triangle for the beak and cut it out. Draw and cut out the feet, facial details, and headgear.
3. Assemble the Chick: Glue on joggle eyes and attach small feathers to the sides.
4. Add Feet: Secure the orange paper feet at the bottom for stability.
5. Final Touches: Add extra feathers on top for a fun, fluffy look!
For more fun Easter craft ideas, explore these creative projects: Easy Easter Treat Bags to Make, Fun and Easy Easter Crafts for Kids: A Guide for Teachers and Parents, and Creative Easter Hat Craft Ideas for Kids.