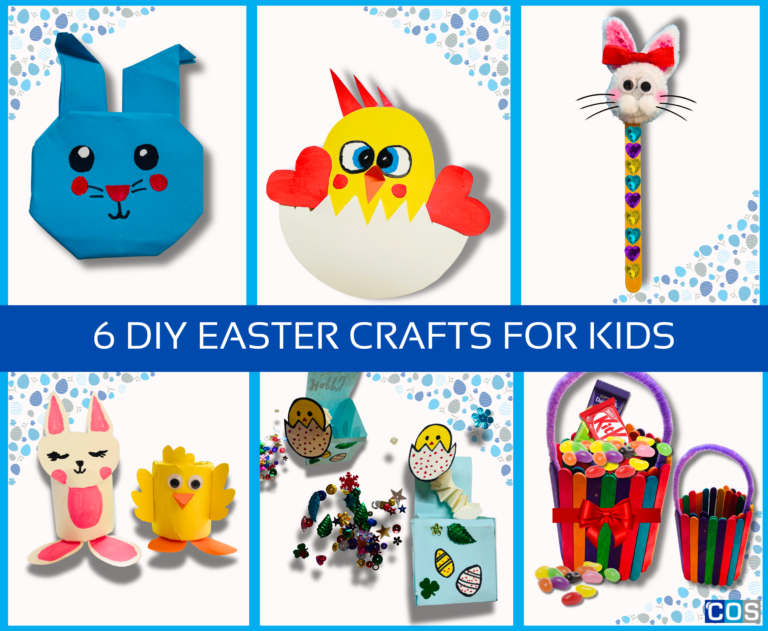
In today’s world, sustainability is more important than ever, and one of the best ways to teach kids about recycling is through hands-on creativity. DIY recycling crafts not only allow children to reuse everyday materials but also spark their imaginations and creativity.
From transforming paper plates into functional clocks to turning cardboard rolls into vibrant fish, these innovative projects offer a fun way to learn about the importance of recycling and repurposing. These activities demonstrate that recycling goes beyond sorting waste; it’s about thinking outside the box and giving new life to everyday items.
So, gather your recyclables and dive into these easy, exciting DIY crafts that turn waste into something beautiful and useful. These simple yet engaging projects encourage kids and adults alike to reduce waste, promote sustainability, and unleash their creativity.
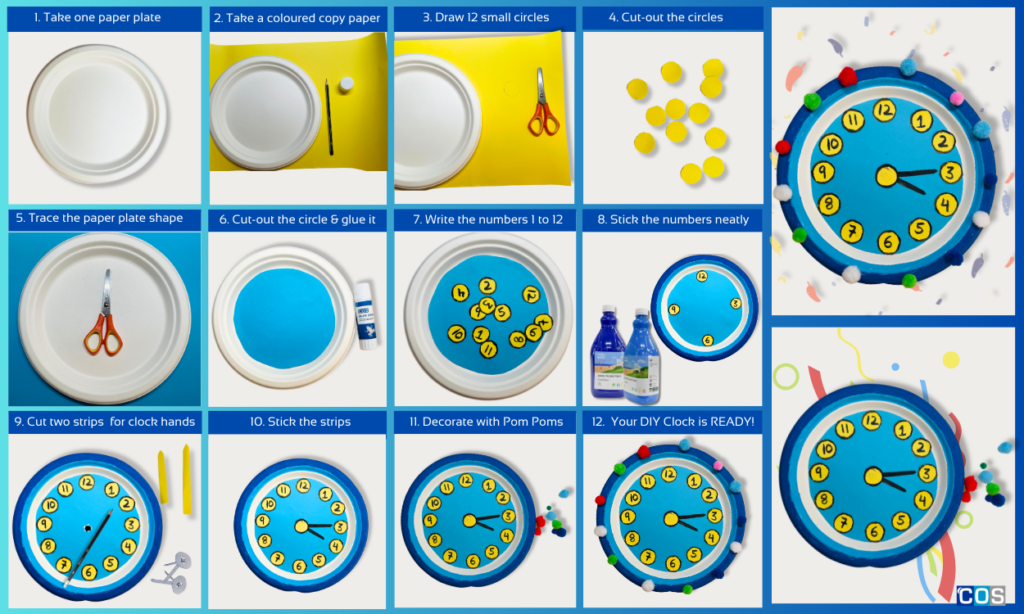
1. Paper Plate Clock
Materials Needed:
- Paper plate
- Compass or any round object
- Copy paper (for clock hands)
- Split pin/Paper Binder
- Marker
- Scissors
- Glue stick
- Ruler
- Pom-poms, rhinestones, sequins, or jewels for decoration
Instructions:
Step 1: Prepare the Paper Plate
- Take a paper plate as the base for your clock.
- Cut a circle from a piece of copy paper to fit the inside of the plate. This will be the background for your numbers.
- Cut 12 small circles from copy paper. These will represent the numbers on the clock.
- Write the numbers 1-12 on the circles using a black marker, ensuring they are clear and readable.
- Decorate the edges of the paper plate using markers or paint. Get creative and use colours or patterns that match the theme you want for your clock!
- Stick the numbers around the edges of the plate. Use a ruler to space them evenly.
Step 2: Create the Clock Hands
- Cut two strips of coloured paper for the clock hands. One strip should be shorter (hour hand), and the other should be longer (minute hand).
- Shape the ends of both strips into a pointed tip for easy identification.
Step 3: Attach the Clock Hands
- Make a small hole in the centre of the plate with a sharp pencil. This is where the clock hands will be attached.
- Poke holes at the ends of both clock hands.
- Secure the clock hands to the plate by attaching them with a split pin/paper binder through the centre hole. This allows the hands to move around.
- Hide the split pin by gluing a small circle of paper over the back of the plate. This ensures the pin is covered and safe.
Step 4: Decorate Your Clock
- Let kids colour the plate. Add fun elements like pom-poms, sequins, rhinestones, or drawings around the clock face.
Step 5: Learn to Tell Time
- Practice setting the time by moving the hands of the clock. Let kids experiment by setting different times.
- Use the clock as a fun learning tool to teach kids how to read time, helping them understand the concept of hours and minutes.
2. DIY Fish Craft Using a Cardboard Roll
Materials Needed:
- Craft cardboard roll
- Paint or coloured copy paper
- Joggle eyes or marker for eyes
- Scissors
- Glue or tape
- Optional: Glitter, stickers, or sequins for decoration

Instructions:
Step 1: Create the Fish Shape
- Flatten one end of the toilet paper roll slightly.
- Cut small slits on the flat end to create a fishtail shape, or simply shape it into a tail and secure with glue or tape.
Step 2: Paint or Cover the Fish
- Cover the fish shape with paint or wrap it with coloured copy paper in your chosen colour.
Step 3: Add Fins
- Cut out two fin shapes from coloured paper.
- Attach them securely to the sides of the roll with glue or tape.
Step 4: Create the Fish’s Face
- Glue on joggle eyes or use a marker to draw eyes, giving your fish personality.
Step 5: Make the Scales
- Draw small circles on different coloured copy paper.
- Cut out the circles carefully.
- Glue them onto the body of the fish, overlapping them for a 3D effect that gives texture to your fish’s scales.
Step 5: Decorate your Fish
- Use glitter, sequins, or rhinestones to make your fish unique and colourful.
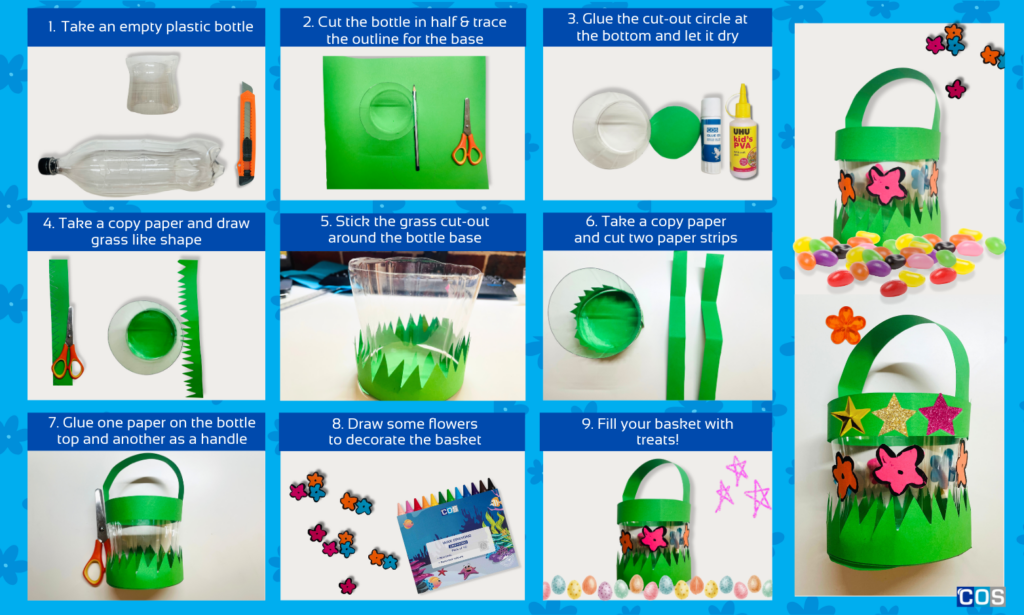
3. Plastic Bottle Easter Basket
Materials Needed:
- An empty plastic bottle (e.g., soda or juice bottle)
- Crayons or coloured markers
- Scissors or a snap cutter
- Paint or coloured paper
- Glue stick or PVA glue
- Ribbon or decorative elements
Instructions:
Step 1: Prepare the Bottle
- Begin by thoroughly washing and drying your plastic bottle.
- Use a snap cutter to trim the bottle to your desired height for the basket.
- If the edges are sharp, smooth them out with tape or gently sand them down for safety.
Step 2: Decorate the Basket
- Cut two strips of coloured copy paper, each 4 cm wide and long enough to wrap around the bottle.
- For one strip, create a grass-like design by drawing and cutting out the shape.
- Stick this grass strip to the bottom of the bottle. Then, wrap the second strip around the top section of the basket.
Step 3: Attach the Handle
- Cut a 2cm W and 10 cm long strip of coloured paper for the handle.
- Stick both ends securely to the inside of the bottle to create a sturdy handle for your basket.
Step 4: Add Decorative Elements
- Draw and colour shapes like flowers or stars on coloured paper.
- Cut them out and stick it in the middle section of the basket.
Step 4: Fill Your Basket
- Fill your basket with Easter eggs, chocolates, or small gifts.
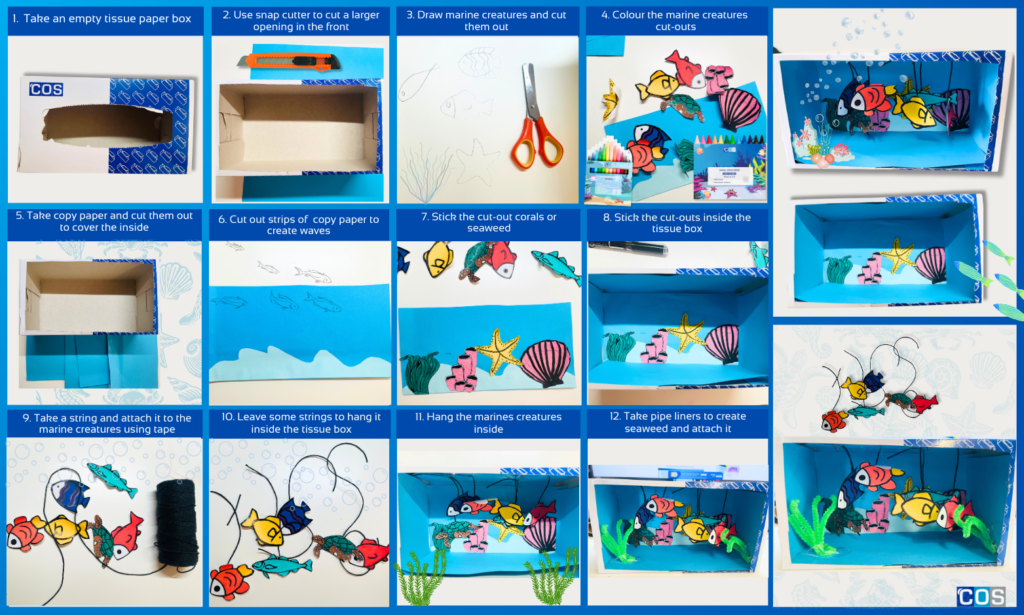
4. Tissue Box Aquarium
Materials Needed:
- Empty tissue box (rectangular with an open top or cut-out front)
- Coloured paper for the background and for creating fish, seaweed, and decorations
- Twine or string (to hang fish)
- Scissors and glue
- Markers or crayons
- Stem Pipe cleaners
Instructions:
Step 1: Prepare the Tissue Box
- Start by removing any paper or plastic from the opening of the tissue box.
- Cut a large rectangle-shaped opening in the front of the box to create a clear “window” for your aquarium.
- Paint the inside of the box a vibrant blue or cover it with blue copy paper to create an ocean-like background.
Step 2: Create the Underwater Scene
- Use a pencil to draw fish, seaweed, and other marine creatures like starfish, crabs, or jellyfish on paper.
- Add fun details, like fins, scales, and facial features, to your fish and intricate patterns to the coral.
- Colour the marine creatures using crayons, markers, or coloured pencils. For added dimension, try using different shades for shading or blending techniques.
- Carefully cut out your fish and sea creatures.
- Use string to attach the fish to the inside top of the tissue box. Tape or glue the string securely, so it looks like your fish are swimming in the ocean.
- Once done, attach fish to strings and tape or glue them to the inside top of the box so they look like they are “floating.”
- Cut out seaweed and coral shapes.
- Glue these to the bottom and sides of the box to create a vibrant underwater world.
- You can layer different sizes and shapes to add depth.
Step 3: Add Sparkle & Fun Details
- Glue sequins, beads, or small shells inside the box for extra shimmer. This will make your aquarium feel even more magical.
Step 4: Display Your Aquarium
- You can display your aquarium on a table or desk to bring some ocean vibes to your space.
Paper Cup Bin
Materials Needed:
- Paper cups (disposable or reusable)
- Glue stick
- Copy paper
- Paint or coloured marker
- Scissors
- Popstick

Instructions:
Step 1: Cover the Paper Cups
- Take 2 paper cups, depending on the size of the bin you want to create.
- If you have any paper cups with printed designs, you can cover them with coloured copy paper to give them a fresh, colourful look.
Step 2: Create the Removable Inner Bin
- Decorate one paper cup and set it aside to be used as the outer bin. Then, take the second paper cup and carefully trim about 2 cm from the top using scissors or a snap cutter.
- This trimmed cup will serve as the removable inner bin for collecting trash.
Step 3: Assemble the Mini Bin
- Place the trimmed paper cup inside the full-sized cup. This will create a removable inner cup for easy disposal.
- If the inner cup doesn’t fit smoothly, trim a bit more from the edges.
Step 4: Attach the Popstick for Creating Paddle
- Using a snap cutter, create a small horizontal cut 2 cm above the bottom of the bin.
- Take one popstick and break it in half. Insert one half into the cut, making sure it moves easily.
- To secure it, attach a small piece (about 1 cm) to the top of the popstick, preventing it from slipping through the opening.
- This popstick will act as a paddle to open the bin’s lid.
Step 5: Create the Lid
- Place the paper cup on a sheet of cardboard or copy paper and trace a circle around its rim. Cut out the circle carefully.
- Stick the cut-out circle to the top of the bin using tape, securing only one side so it can open like a flap.
- To create a handle, cut a strip of copy paper 1 cm wide x 8 cm long and stick it in the middle of the lid (as shown in image 7).
Step 6: Decorate the Bin
- Add a recycling logo or write a label on the bin, such as “Mini Trash Bin” or “Recycle Here.”
Step 7: Start Using Your Mini Bin
- Place it on your desk, study table, or craft station.
- Press the popstick to open the lid and dispose of small trash items like pencil shavings or candy wrappers.
- When full, remove the inner cup, empty it, and reuse!
If you’re looking for fun and creative ways to create with your recycling, these DIY recycling projects are the perfect place to start.
Transform an old cardboard box into a decorative bookcase, perfect for organising books and small items. If you have plastic waste lying around, try one of 4 fun and creative upcycled plastic projects for recycling everyday plastic items into colourful planters, wall art, or even toys. For even more hands-on recycling craft fun, explore Zero-Waste Craft Activities for Kids, designed to spark creativity while teaching little ones about sustainability in a fun and engaging way.