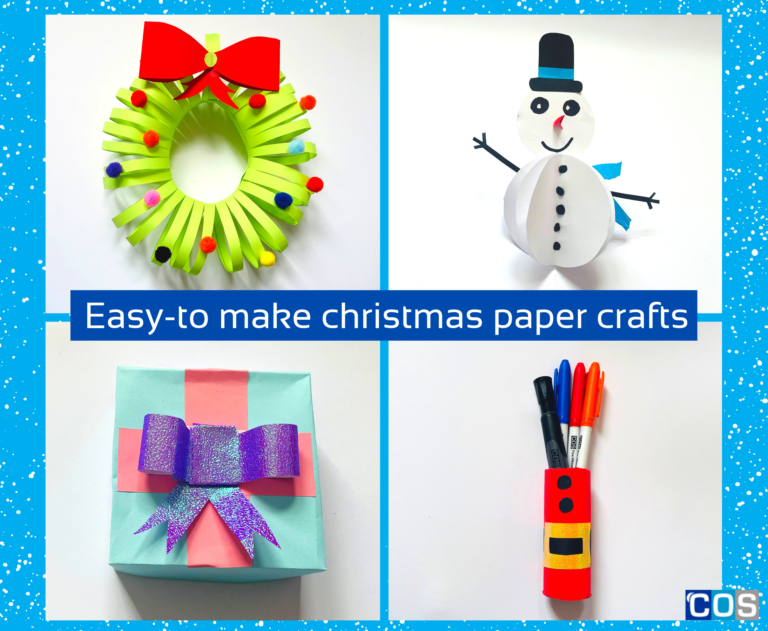
Is there a better time of year than Christmas and the holiday season to work on a fun project? With Christmas fast approaching, there’s never been a better time for teachers and parents to engage little ones in some crafting to get them in the holiday spirit.
We’ve curated 4 holiday-themed paper crafts that are easy to make and totally mess-free. So, gather your art and craft stack and get busy crafting!
3D Paper Snowman
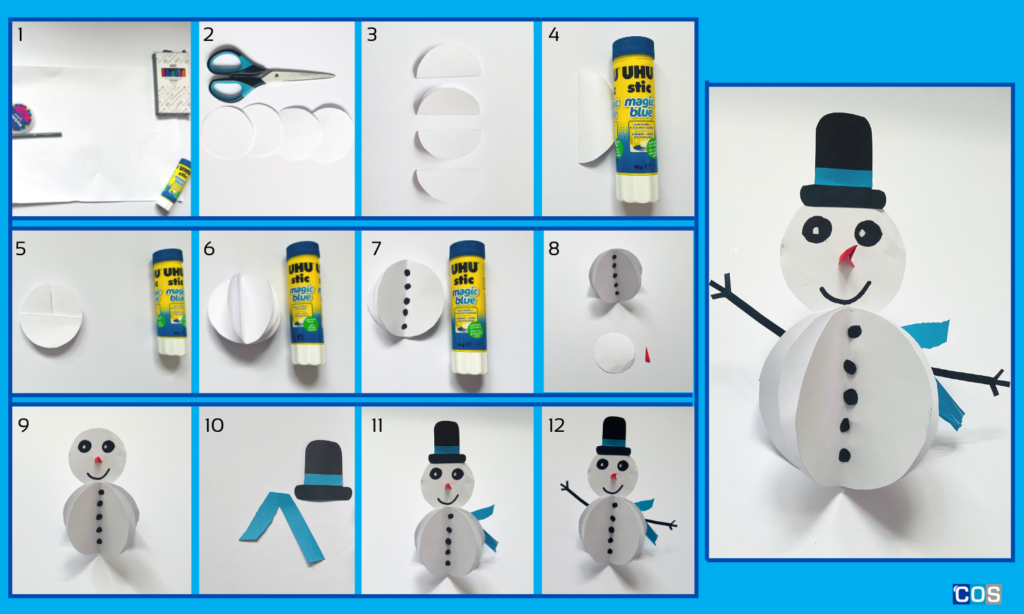
Things you’ll need:
- A3 white copy paper
- A4 Coloured paper ( black, blue, and red/orange) for the nose, scarf, and hands
- Black marker
- 2 circles (8cm and 5cm) for tracing – like bottle lids, glasses – whatever you can find
- Ribbon, string or twine for hanging
- Scissors
- PVA glue or glue stick
Instructions:
- Cut the circles neatly and fold each cut-out in half.
- To make the snowman’s base, glue one folded circle to the back of two folded circles. As seen in the photos.
- Take the remaining folded circle and glue it down the centre of the two circles. After that make buttons with a black marker.
- Trace another round object, this time smaller than the previous one, on white copy paper. Cut the circle neatly and place it on top of the circles to form a head.
- Make a nose out of an orange/red sheet. Cut a small triangle, fold it, and glue it in place between the eyes.
You can use a maker to draw the eyes and mouth. - Cut out the pattern for the hat, trace it on black paper, and glue it on top. Make hands out of black copy paper and stick them on both sides.
- Create a scarf from a blue sheet. Place it on the snowman’s ridge to give it a wintery feel.
Cardboard Roll Stationery Holder
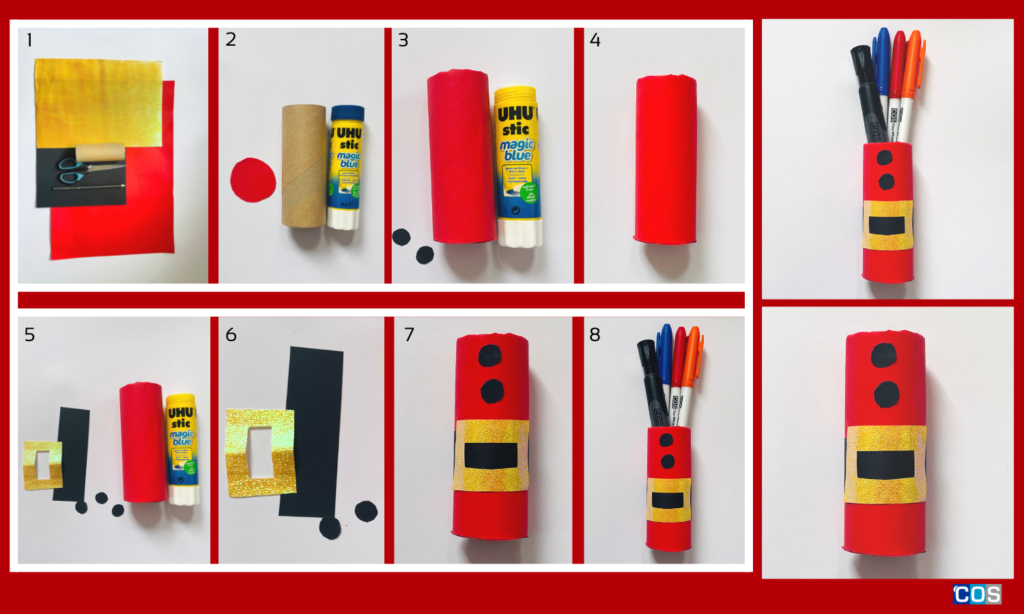
Things you’ll need:
- 1 cardboard roll
- A4 red and black copy paper
- Glitter paper (any colour)
- Scissors
- PVA glue or glue stick
Instructions:
1. Cover the bottom of the cardboard roll by tracing it on copy paper. Using scissors, cut a circle and glue it to one end of the cardboard roll.
2. Using a glue stick, cover the entire paper roll with red copy paper.
3. To make a belt, cut a 3cm wide by 5cm long piece of black copy paper.
4. For the buckle, draw a 1.5cm wide by 3cm long rectangle on glitter paper and cut it out.
5. Using a black marker, make buttons or cut small circles from the remaining black paper.
6. Your Christmas-themed stationery stand is ready fo the season!
Adorable Christmas Gift Box
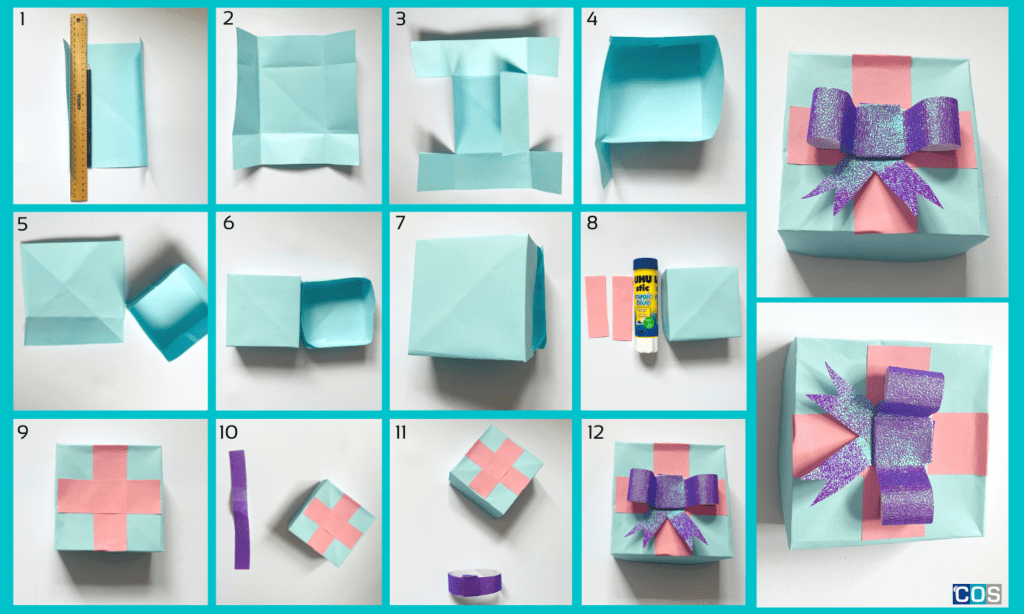
Things you’ll need:
- Square coloured copy paper
- Scissors
- Ruler
- Pencil
- PVA glue or glue stick
Instructions:
- We used 12×12 papers to make a 4 1/4″ x 4 1/4″ box, which is roughly one-third the size of the paper.
- The box is divided into two sections: the base and the lid. One sheet is 12″ x 12″ copy paper. The second part can be smaller or larger than the first, so make it 1/2″ bigger or smaller. The larger part will be the lid, and the smaller part will be the base.
- Fold your paper from all four sides to meet at the centre point to make it a diamond shape.
- Unfold the folds at the top and bottom. Turn the left and right sides in.
- Make four cuts as shown in the image below. It doesn’t matter which corners you cut as long as they are diagonal to each other.
- Now glue the cut part inside to make a square.
Repeat the same process for making the lid. - To make a bow, take 2 copy paper pieces approx 4cm wide and 4 cm wide and glue them on top of the lid.
- Now, take a piece of glitter paper and cut it into 1.5″ wide strips lengthwise (cut 3 strips total). Trim the ends of the paper strips to make them 11″ long | 9.5″ long | 6″ long. To make the ribbons, cut another strip of paper in half and notch the ends.
- Make a loop from each strip of paper, slightly overlapping the ends and securing them with glue. Repeat with the remaining three strips. Insert a small piece of double-sided tape into each of the two larger loops and press down to adhere and shape each bow. Layer the smaller bow piece on top of the larger bow piece and secure it with tape, then secure the small loop to the top centre with tape to complete your gift bow.
Christmas Wreath
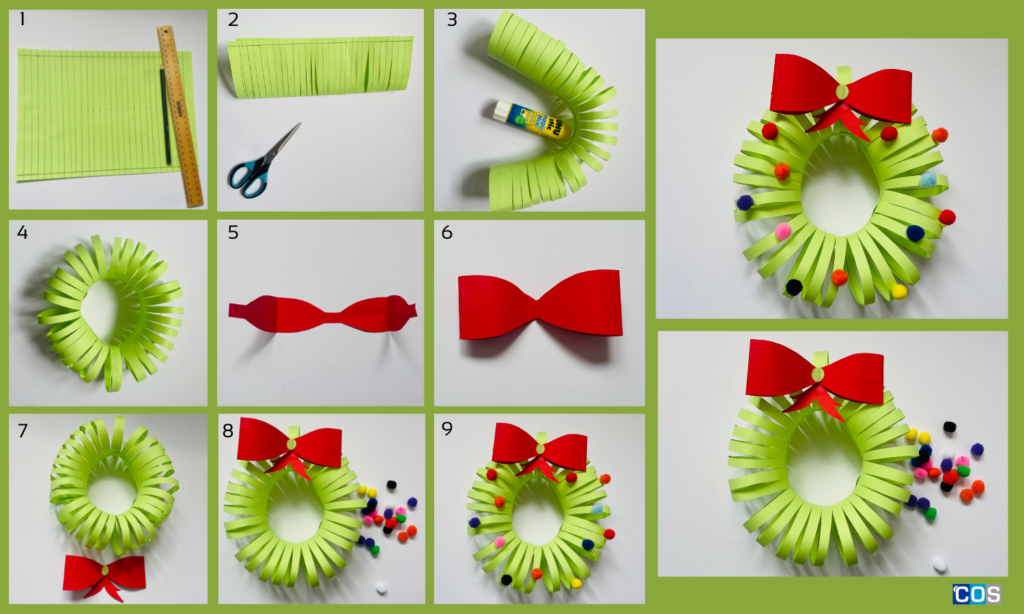
Things you’ll need:
- A3 coloured copy paper (green and red)
- Pencil
- Scale
- Scissors
- PVA glue or glue stick
- Pom poms or rhinestones
Instructions:
- Make 2 lines parallel to the paper’s long edges at a distance of 1/.5cm.
- On each line mark intervals of 1cm and join corresponding points.
- Fold the paper in half and cut along the marked lines.
- Join the long edges along the 1.5cm margin
- Now join the ends together with glue to form a ring.
- It’s time to add a bow on the top.
- For the decoration, you can use pom poms or rhinestones to make it more colourful.
No products were found with the applied settings
