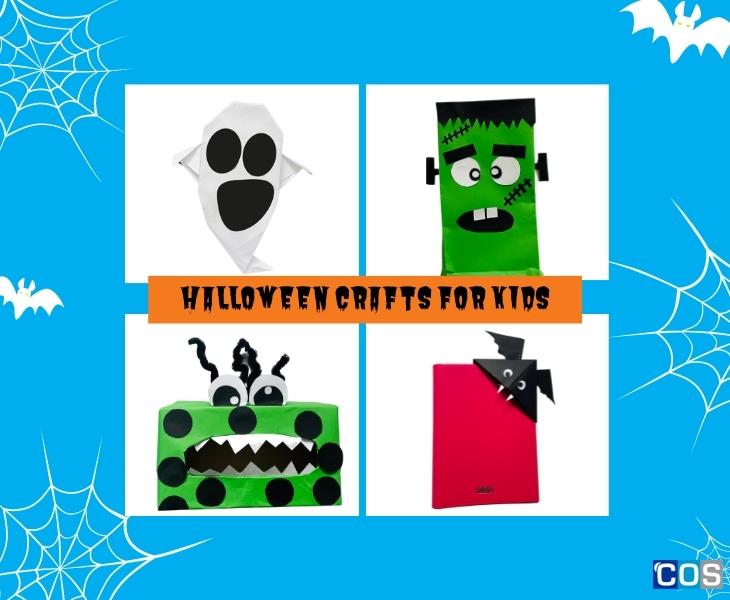
Get into the Halloween spirit with these adorable crafts! This month, encourage the little ones to express their creativity with these fun, spooky, and easy Halloween crafts. They’re easy for kids of all ages to do; all you need is a few basic supplies to get started!
Tissue Box Monster
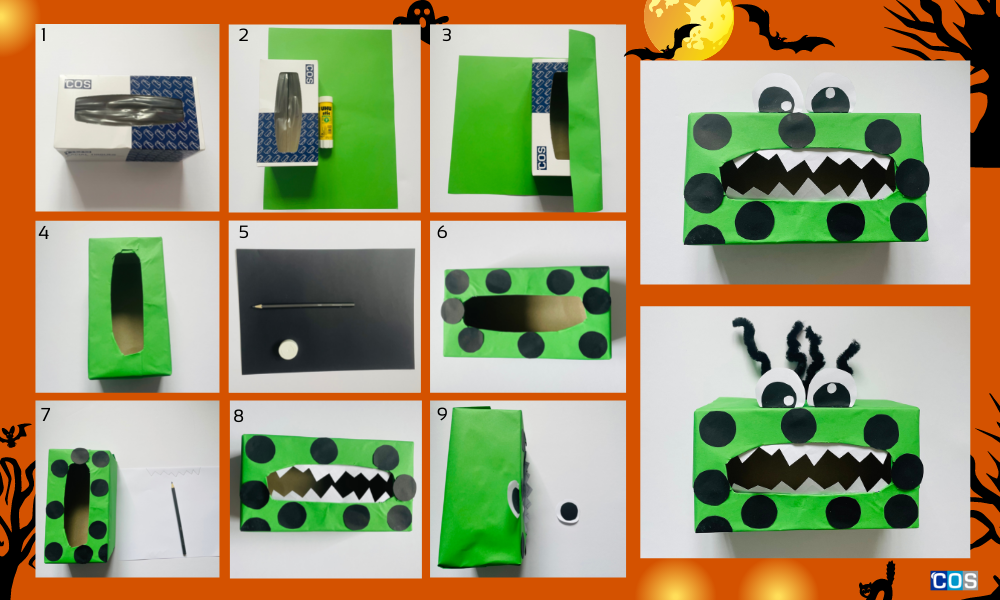
Things you’ll need:
- Tissue box
- PVA glue/glue stick
- Marker
- A3 copy paper
- Scissors
Instructions:
- Before you begin, remove any plastic inner lining from the tissue box.
- Cover the entire tissue box with any coloured A3 copy paper and stick it down using a glue stick or PVA glue.
- Once dry, cut away the excess paper from the monster’s “mouth” with a snap cutter (the opening of the tissue box).
- Using any round object (like a 20cent piece or a glue stick lid), trace small circles on copy paper. Cut them neatly with scissors and glue them to the “face” around the mouth opening.
- Make large teeth out of paper or white cardstock. Glue the teeth to the inside of the mouth of the tissue box.
- Add some personality to your monsters by sticking some pipe cleaners to the top of the tissue box.
- Aren’t these monsters adorable? We love how simple they are and that you can make them out of a tissue box!
Frankenstein Paper Bag
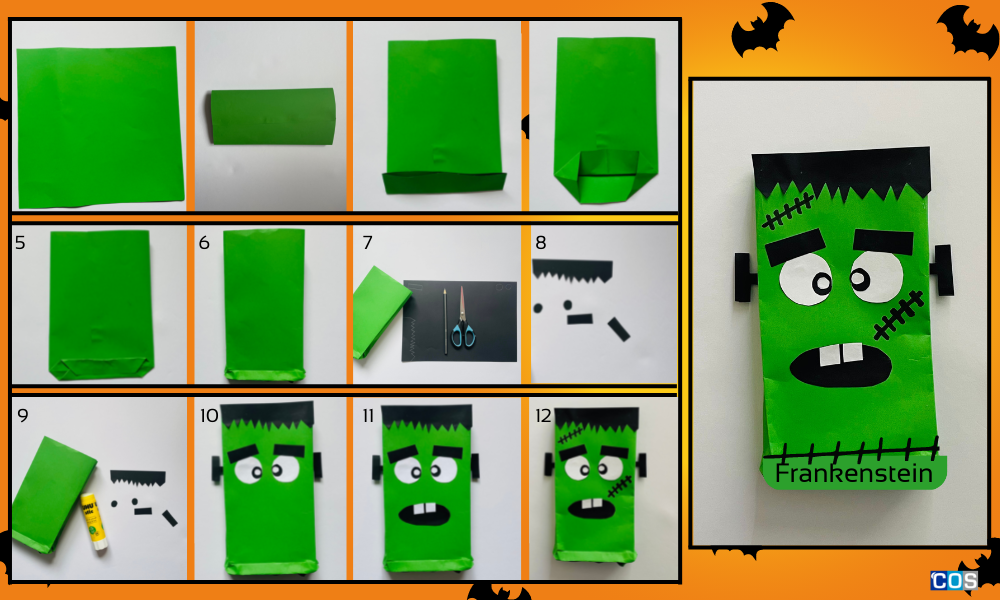
Things you’ll need:
- A4 green and black copy paper
- Black marker
- Scissors
- Pencil
- PVA glue/glue stick
Instructions:
- Take a coloured A4 sheet and fold the craft paper in half horizontally, leaving a 1/2 cm margin on one side, as seen below.
- Take a glue stick and apply it to the section that is 1/2 cm long
- To make the bottom of the bag fold the short side up about 2 cm.
- Take glue and apply on both sides and leave it for a few seconds.
- Fold the long sides of the bag as shown, matching the corners and this will create crease lines on the sides of the bag.
- For the face: While your paper bag is drying, cut out pieces for your Frankenstein: hair, eyebrows, mouth, teeth, and bolts.
- Glue the zig-zag border strip (hair) along the open end of the bag.
- Glue the eyes and brows directly beneath the hair, leaving a space between the hair and the eyes.
- Glue the mouth and the 2 square patterns (tooth) along the bottom side of the mouth’s inner part.
Stick the t-shape patterns (nuts and bolts) on both sides of the paper bag. To make it more spooky, draw some stitches on top and bottom using a black marker.
Ghost Paper Origami
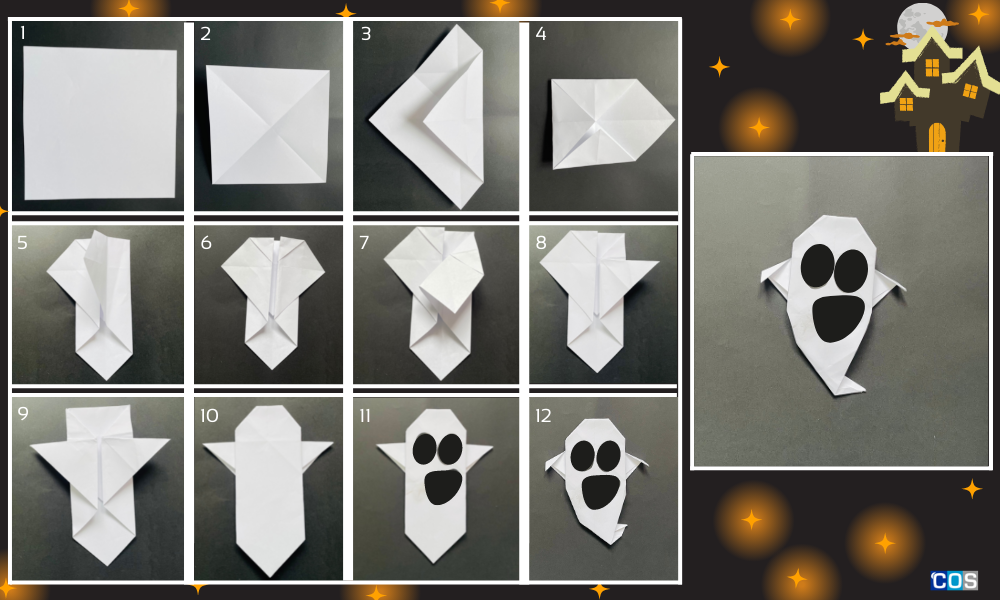
Things you’ll need:
- A4 white copy paper
- Scissors
- PVA glue/ glue stick
- Black marker
Instructions:
- Cut a square of white copy paper and fold it in half diagonally. Then, in the opposite direction, unfold and fold again. When you unfold the square, you’ll see two diagonal lines running across it.
- Rotate the square piece of paper, so that the corners are facing up and down. Fold the bottom corner inward, as well as the left and right corners. Unfold the paper to reveal all of the creases.
- You now have two points above the horizontal diagonal on either side. Fold down along the line that connects these dots. Turn the square over so that the fold is now underneath, creating a diamond shape. From either end, fold the two corners inward along the first line.
- Flip the paper over again so that the fold is visible. Fold the two edges in so that the corners flap out. Fold the right side up and the upper portion of this flap down and tuck it in as you fold back to the right.
- Now unfold the last fold. Fold down diagonally along the newly formed crease. Fold the bottom portion of this flap up to form a neat triangle. Repeat the same steps on the left side. Flip the paper over so that all of the folds are on the back.
- Make small folds on both flap ends and at the tail end. Draw facial features for the ghost with markers. That’s it; your spooky ghost is ready.
Bat Corner Bookmarks
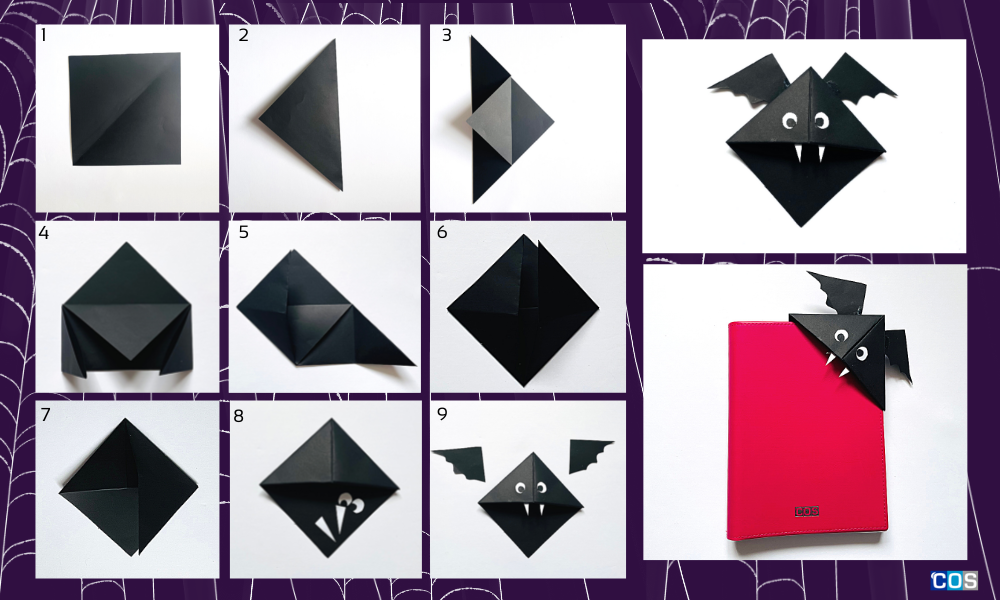
Things you’ll need:
- A4 black copy paper
- White paper
- Scissors
- PVA glue/glue stick
- Pencil
Instructions:
- Fold the craft paper diagonally on both sides. Unfold it, as pictured and then fold into a triangle.
- Take the top of the triangle and fold it towards the bottom (to the center). Crease thoroughly.
- Take the left corner and fold it towards the triangle’s bottom centre.
- Repeat the same on the opposite corner. Fold both ends in half and take hold of the left corner and fold it towards the triangle’s top.
- Repeat with the opposite corner. Place the left “flap” in the pocket.
Repeat with the other. - Make two wings and eyes using black copy paper. Make two white paper fangs. Stick them using glue stick to your bookmark.
- Your bat corner bookmarks are ready to devour your favourite books.
