Mother’s Day is a beautiful opportunity for kids to express their love and gratitude for the amazing mums and mother figures in their lives. And what better way to show your love than with something made by hand and straight from the heart.
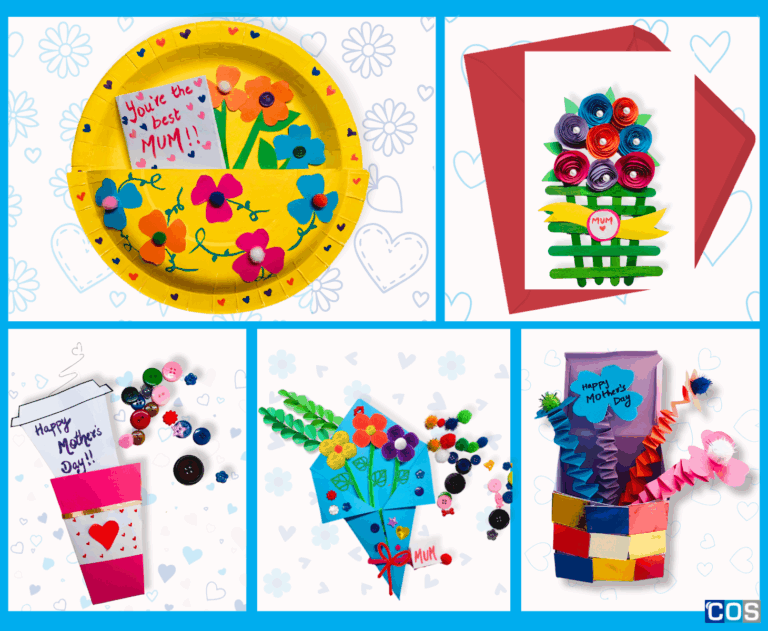
This year, skip the store-bought gifts and dive into the joy of creating with our collection of DIY craft ideas, designed especially for kids. These simple yet meaningful projects are not only fun to make but also filled with love, creativity, and personal touches that will make any mum’s heart melt.
From vibrant paper flower bouquets and adorable coffee cup cards to colourful baskets bursting with affection. Each craft is more than just an art project. It’s a keepsake filled with love, a message from the heart, and a memory you mum will treasure for years to come.
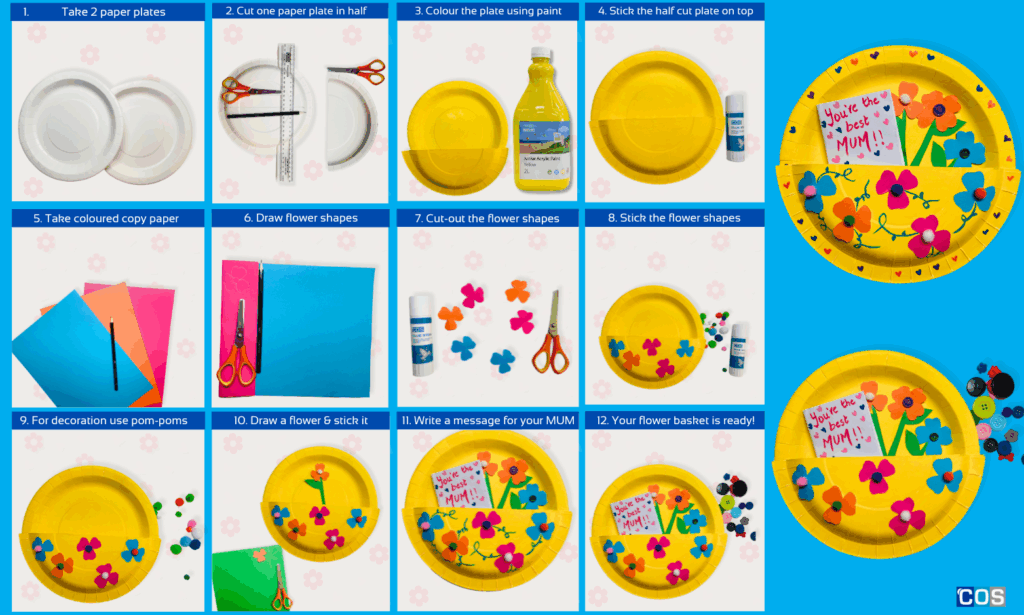
1. DIY Paper Plate Flower Basket
Materials Needed:
- 2 paper plates
- Scissors
- Glue stick or craft glue
- Paint
- Coloured copy paper (for flowers and leaves)
- Ruler
- Pencil
- Marker
- Decorative elements (pom-poms, rhinestones, sequins, or buttons)
Step-by-Step Instructions:
1. Prepare the Basket Base
- Take one paper plate and fold it in half.
- Cut along the fold to create two equal halves.
- Set aside one half – this will become the front pocket of your basket.
2. Paint Your Plates
- Paint both the full paper plate and the half plate in your favourite colours.
- Let them dry completely.
3. Create the Basket Pocket
- Once dry, glue the half plate onto the front of the full plate, curved side facing up.
- This will form the pocket of your basket.
4. Make and Decorate the Flowers
- Use coloured paper to cut out flower shapes.
- Glue a pom-pom in the centre of each flower.
- Cut out green leaves and stems and attach them behind the flowers.
5. Add the Flowers to the Basket
Arrange and glue the flowers inside the pocket so they look like they’re blooming out of the basket.
6. Decorate Your Basket
- Get creative! Use markers to draw fun patterns or doodles on your basket.
- You can also glue on colourful buttons, pom-poms, sequins, or rhinestones to give it extra sparkle.
- You can use markers, buttons, or pom-poms to decorate the plate or draw some shapes.
7. Write a Message
- Write a heartfelt note or Mother’s Day message on a small piece of paper.
- Tuck it into the basket pocket as a lovely surprise.
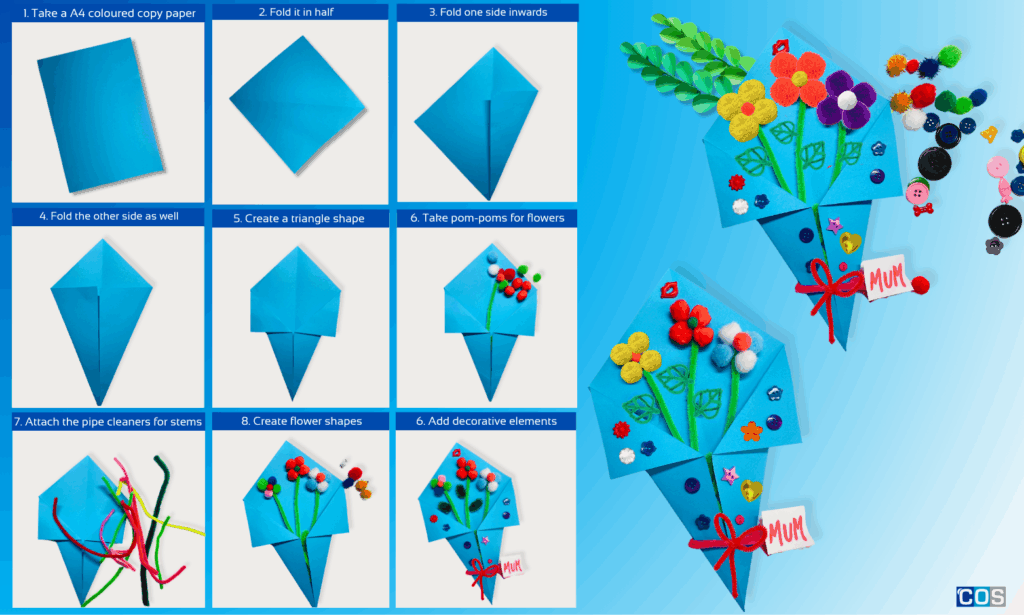
2. Pom-Pom Flower Bouquet
Materials Needed:
- Coloured copy paper (for base)
- Scissors
- Glue stick or craft glue
- Pipe cleaners
- Decorative elements (pom-poms, rhinestones, sequins, or buttons)
- Ribbon or string (for tying the bouquet)
Step-by-Step Instructions
1. Prepare the Bouquet Base
- Take a 20 x 20 cm coloured sheet.
- Fold one bottom corner inward to create a triangle at the bottom.
- Fold the side flaps inward to form a cone-like bouquet shape.
- Secure the folds with a glue stick or tape if needed.
2. Create the Stems
- Use green pipe cleaners to form your stems.
- You can curl the top slightly to help attach the flowers later.
- Stick the stems inside the bouquet using glue
3. Make Pom Pom Flowers
- Choose colourful pom poms to create the flowers.
- Place the pom-pom flowers on top of the stems and hold it for a few seconds to ensure it sticks well.
4. Add Leaves
- Cut out leaf shapes from green paper or bend pipe cleaners into leaf shapes.
- Glue 1–2 leaves near the base of each flower on the stem.
5. Arrange Your Bouquet
- Once all flowers are ready, arrange them together in the cone base.
- Tie them with a ribbon or string to keep them bundled.
6. Add Embellishments (Optional)
- Decorate your bouquet with rhinestones, sequins, buttons, or jewels.
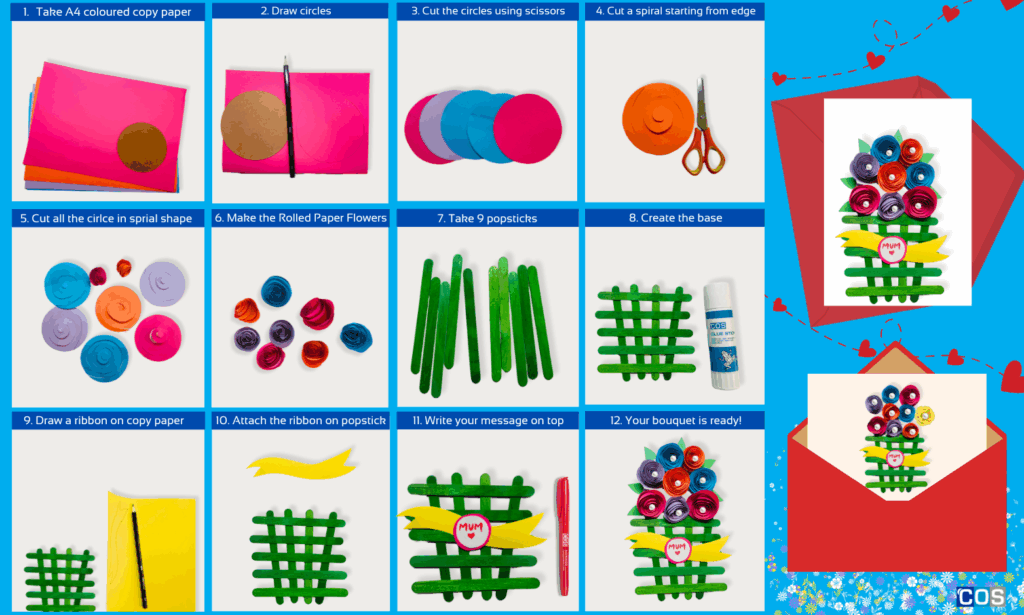
3. Rolled Paper Flower Bouquet with Popstick Vase
Materials Needed:
- Coloured copy paper (for base)
- Popsticks
- Pencil
- Scissors
- Glue stick or craft glue
- Coloured markers
- Decorative elements (pom-poms, rhinestones, sequins, or buttons)
Step-by-Step Instructions:
1. Prepare the Paper Base
- Choose a square sheet of coloured copy paper (approx. 10–12 cm wide).
- This will be the background for your flower bouquet.
2. Create Your Flower Circles
- Use different coloured copy paper to draw and cut out several circles – these will become your rolled flowers.
3. Draw a Spiral on Each Circle
- On each circle, draw a spiral starting from the outer edge and winding towards the centre.
4. Cut the Spiral
- Carefully cut along the spiral line with scissors all the way to the centre.
5. Roll into Roses
- Begin rolling the spiral tightly from the outer edge inward.
- Once you reach the centre, let it loosen slightly to form a rose shape.
6. Build the Popstick Vase
- Lay out 5 popsticks horizontally and 5 vertically in a grid shape to form a vase base.
- Glue the structure directly onto your paper base and press gently to secure.
7. Attach Your Rolled Flowers
- Apply glue to the flat base (centre) of each rolled flower and press them onto the popstick vase.
8. (Optional) Add Leaves
- Cut out small leaf shapes from green paper and glue them around the roses to complete your bouquet.
9. Write Your Message
- Draw and cut out a ribbon shape from copy paper.
- Write your message on the ribbon and glue it onto the popstick base as a sweet finishing touch.
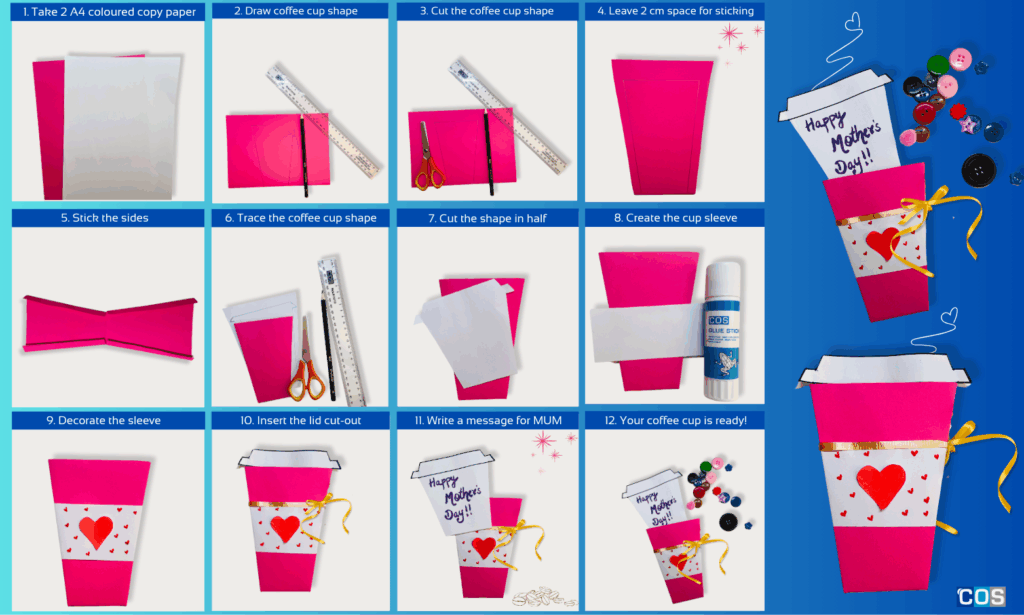
4. Coffee Cup Card for Mum
Materials Needed:
- Coloured copy paper (for base)
- Ruler
- Pencil
- Scissors
- Glue stick or craft glue
- Coloured markers
- Ribbon
Step-by-Step Instructions:
1. Create the Coffee Cup Shape
- Grab a piece of coloured copy paper and fold it in half.
- On one side, draw the outline of a coffee cup – wider at the top and narrower at the bottom.
- Leave about 2 cm along one edge to create a pouch when glued.
- Cut out the shape and stick the side together – this will be the base of your coffee cup.
2. Make the Coffee Lid Message Card
- Take another sheet of coloured paper.
- Place your coffee cup shape on it and trace the outline.
- Draw a lid shape on top (rounded or rectangular) so it looks like a takeaway coffee lid and is easy to pull out.
- Cut it out – this will be the message insert that slides into the pouch.
3. Add the Coffee Cup Sleeve
- Take another copy paper, cut a rectangle (5 cm wide x 8 cm long).
- Glue the rectangle horizontally in the middle of the coffee cup pouch – this is your coffee sleeve!
- Add fun decorations like hearts, pom-poms, or rhinestones.
4. Personalise with a Message
- Write a special message to Mum on the coffee lid card, such as: (“I love you a latte”, “Thanks a latte for all you do”, “You’re brew-tiful, Mum”).
5. Assemble the Surprise
- Slide the coffee lid message card into the pouch.
- Wrap a ribbon around the cup for a special finishing touch – tie it in a cute bow!
- Your adorable, handmade coffee cup card is now ready to surprise your mum!
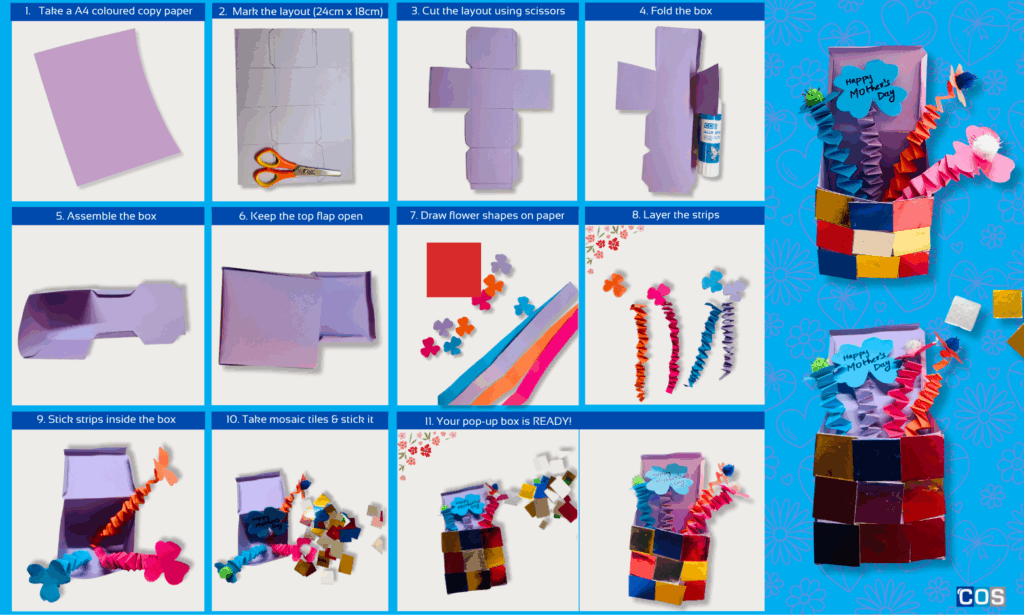
5. Pop-Up Surprise Box
Materials Needed:
- Coloured copy paper (for box base)
- Cardboard mosaic squares
- Ruler
- Pencil
- Scissors
- Glue stick or craft glue
Step-by-Step Instructions:
1. Draw the Box Layout
- Draw a large rectangle: 24 cm (long) × 18 cm (wide) – this is the base of your box.
- On each side of the rectangle, draw a 5 cm flap (top, bottom, left, and right).
- On one long side only, above the 5 cm flap, add an extra 6 cm section – this will become the lid flap.
2. Cut the Box Shape
- Cut around the outer edges of your full box shape, including all flaps and the lid.
- Use a ruler to score/fold along each line for clean, crisp edges.
3. Fold and Glue
- Fold all side flaps upward along the scored lines.
- Apply glue to the edges of the flaps and press them together to form the box’s walls.
4. Fold the Lid Flap
Fold down the 6 cm lid flap to create a closing lid over the box.
5. Create the Flowers
- On coloured copy paper, draw and cut out flower shapes.
- Use different colours and sizes for extra fun.
6. Make the Bouncing Strips
- Cut thin paper strips: each 1.5 cm wide × 24 cm long.
- Fold them over each other in a crisscross pattern (like a spring).
- When you reach the end, glue both ends to hold the bouncy shape.
7. Assemble the Surprise Box
- Stick one end of the bouncy strip inside the bottom of the box.
- Glue the other end to the back of the flower cut-outs.
- Gently press the flowers down and close the lid.
8. Decorate the Box
Stick on mosaic square tiles to decorate the outside of your box.
Looking for more creative ideas to make this Mother’s Day extra special. We’ve got you covered with a variety of fun and easy craft projects for kids.
Explore 4 Easy and Fun DIY Mother’s Day Crafts for Kids that are perfect for little hands, or try 4 Adorable Craft Projects to Celebrate Mum to bring a smile to her face.
If you’re looking for something simple yet heartfelt, check out our Easy-to-Make Popstick Mother’s Day Craft Ideas, offering a charming and personal touch that Mum will treasure.
These projects are not only easy to make, but also full of love, making them the perfect way for kids to show their appreciation and create lasting memories.